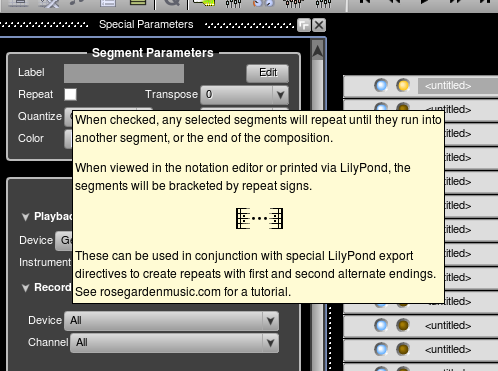
Table of ContentsTooltips Tutorial for Programming DummiesAfter some discussion on the devel list, we've decided we need a lot more tooltips. I want to add more tooltips, and make better, more useful tooltips taking advantage of Qt4's rich text capabilities. I got this little project started by adding a mostly complete set of tooltips to the SPB today. In particular, there's a fancy new tooltip, we'll call it the “drool tip,” hanging off the repeat button in the SPB. Here's what it looks like: Find a WidgetIf you want to add a tooltip, first you need to find the widget in the code. The easiest way to do this is usually to find its associated label by name. Often there will be a label next to a combo box or something, but if you find the one, you can find the other pretty easily. (If you get stuck, you can always ask one of the resident code jaguars or code gazelles for help.)
Let's say you're a rank novice and have no idea how our code is structured. You want to find the “Edit” button in the Segement Parameters box, but don't know where it is. “Edit” is not a very good string to search for, but you can start there. (You can also use find . -name \*.cpp|xargs grep "Edit" This returns 1564 hits. Ouch. So try adding another grep for “Segment” to this: find . -name \*.cpp|xargs grep "Edit"|grep Segment 118 hits. So add “Parameter” to the list: find . -name \*.cpp|xargs grep "Edit"|grep Segment|grep Parameter That gets down to 9 hits, and the answer is right in here: ./src/gui/editors/parameters/SegmentParameterBox.cpp:#include "gui/widgets/LineEdit.h"
./src/gui/editors/parameters/SegmentParameterBox.cpp://#include <QLineEdit>
./src/gui/editors/parameters/SegmentParameterBox.cpp: m_labelButton = new QPushButton(tr("Edit"), this);
./src/gui/editors/parameters/SegmentParameterBox.cpp: m_labelButton->setToolTip(tr("<qt>Edit the segment label for any selected segments</qt>"));
./src/gui/editors/parameters/SegmentParameterBox.cpp: SLOT(slotEditSegmentLabel()));
./src/gui/editors/parameters/SegmentParameterBox.cpp: m_colourValue->setEditable(false);
./src/gui/editors/parameters/SegmentParameterBox.cpp: LineEdit::Normal,
./src/gui/editors/parameters/SegmentParameterBox.cpp:SegmentParameterBox::slotEditSegmentLabel()
./src/gui/editors/parameters/SegmentParameterBox.cpp: LineEdit::Normal,
It turns our our widget is That pasted code snippet above is actually on the code I just changed, but if you had been doing this from scratch, you would have found this in the right area to begin working: // .. and edit button m_labelButton = new QPushButton(tr("Edit"), this); m_labelButton->setFont(font); // m_labelButton->setFixedWidth(50); Add the Tooltip
Now that you've found your widget, you can edit that source file and create your tooltip. Find an appropriate line somewhere around where the widget is initialized (syntax like
You will probably always use the Now you want to add your tooltip with setToolTip() and tr(), something like thus: // .. and edit button m_labelButton = new QPushButton(tr("Edit"), this); m_labelButton->setFont(font); m_labelButton->setToolTip(tr("Edit the segment label for any selected segments")); // m_labelButton->setFixedWidth(50); Fancier TooltipsThe above will cover most cases, but what if there is a widget that has a particularly interesting story to tell? Let's use the current state of the SPB repeat checkbox as an example.
First, we're going to need to wrap the whole thing in HTML-style tags to get its formatting to work out nicely. You can use either
Inside the Writing some huge amount of text on one line is obnoxious and confusing for developers, so you will want to break up the lines. All the text on every line will have to be surrounded by quotes, and you should keep the quotes on the right hand side at the same place. We don't really have a fixed right margin in our code, so just try to pick something sensible. Extra spaces at the end won't show up in your text, and if you have to cut words in half, that won't matter either. Here's the above tooltip, in code: m_repeatValue->setToolTip(tr("<qt><p>When checked, any selected segments will repeat until they run into another segment, " "or the end of the composition.</p><p>When viewed in the notation editor or printed via LilyPond, " "the segments will be bracketed by repeat signs.</p><p><center><img src=\":pixmaps/tooltip/repeats" ".png\"</img></center></p><br>These can be used in conjunction with special LilyPond export direct" "ives to create repeats with first and second alternate endings. See rosegardenmusic.com for a tut" "orial.</qt>")); Adding an Image
The above example uses an image. As you can see, you just stick it in a plain HTML
<file>pixmaps/tooltip/repeats.png</file>
<file>pixmaps/tooltip/your-image-name.png</file>
Test and Commit
After you've added a tooltip, build the source and navigate to your new widget to test it. In order to get your new image built into the resource bundle, you'll have to delete rm data/data.o&&make -f qt4-makefile&&./rosegarden
If you get compile errors, the most common things are using a → when you should have used a ., and “ related problems. Also ( problems. If you use an image, be sure the image is working.
Now commit your work with Anyone not having SVN commit access and working on this project will get SVN commit access in short order. Don't worry, anything you break can be un-broken, and it's not as scary as it sounds. Now, any takers? |

