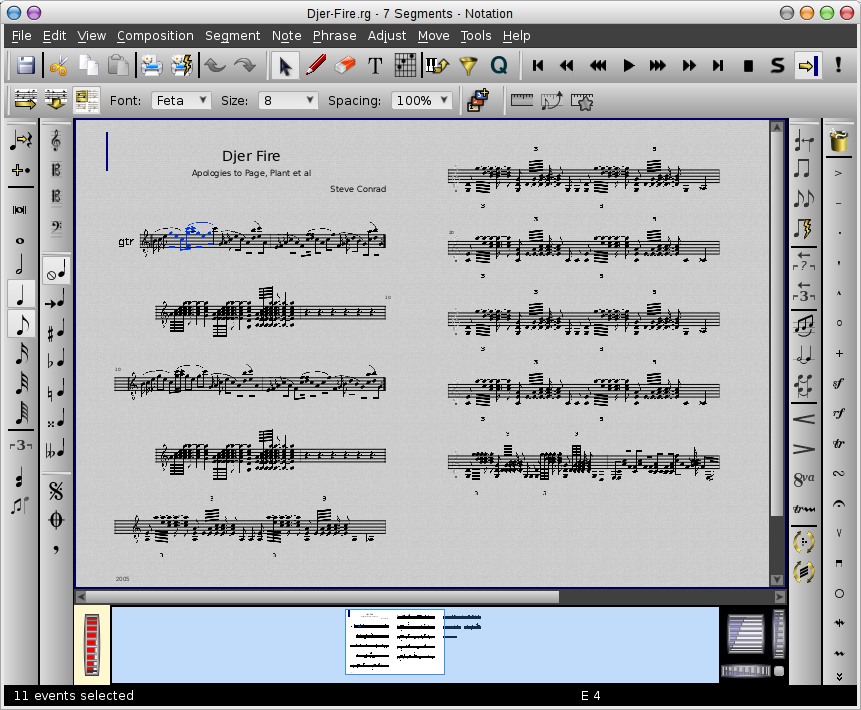
Table of ContentsThe Notation editorIntroductionThe Rosegarden notation editor enables you to view and edit one or more staffs in traditional score notation. It can be found under Segments → Edit With → Open in Notation Editor (N). Rosegarden aims to present scores with the best possible layout compatible with its primary focus as a sequencer application. This means that although the editor supports chords, overlapping and nested beamed groups, triplets and arbitrary tuplets, grace notes, dynamics, accents, text and so on, it does not provide as much fine control over layout (especially in contrapuntal music) as a dedicated score editing program might. Rosegarden does not aim to produce typeset-quality score, although it exports LilyPond files, which form a good basis for typesetting. Single and multiple staffsThere are three ways to open a notation editor from the Rosegarden main window. They all require that you have some existing segments in the main window first, so if you're starting a new composition, you should create your segments before you start thinking about how to edit them. Double-clicking on segments The most obvious way is just to double-click on a segment in the main canvas. This opens the segment in whatever you have configured as the default editor (notation, matrix, or event list), and by default this is the notation editor. So double-clicking a single segment will open it as a single staff in a notation editor window. You can also open a multi-staff editor this way: holding down the Shift key, select (with a single mouse click) each of the segments on the main view that you want to open, but double-click on the last one. All of the selected segments will then be opened together in a single notation window. The Open in Default Editor menu function (the Return key) The Return key is a shortcut for Open in Default Editor, which does much the same thing as double-clicking: opens all of the currently selected segments together in a notation editor, or in whichever other editor you have configured as your default. The Open in Notation Editor menu functions Alternatively, you can use the main window's Open in Notation Editor menu function, either on the Segments menu or on the right-button popup menu on a segment in the canvas. Select the segments you want to edit (by shift-clicking as above, or by using Select All Segments) and then select Open in Notation Editor. If you have more than one staff (i.e. segment) visible in the notation editor, only one of them can be “current” at once. The current staff can be distinguished because it has the insert cursor on it (see Rulers and Cursors), and this is the staff on which any editing operations that use the insert cursor will take place. The topmost staff is the current one by default, but you can switch to a different staff by Alt-clicking on it, or by using Move → Local Cursor → Cursor Up Staff (Alt+Up) and Cursor Down Staff (Alt+Down). Linear and page layoutsThe usual way the notation editor displays staffs is known as linear layout: one staff on top of another, with each staff as a single, horizontally scrollable long line. Some of the functions of the editor (such as the Rulers) are only available in linear layout View → Layout Mode → Linear Layout However, you can also display staffs in two different page-based layouts: continuous page and multiple page layouts. In continuous page layout, View → Continuous Page Layout → Linear Layout the music is arranged in one infinitely-tall page of the same width as the window. Each staff breaks at the end of a line, starting a new line below the remaining staffs. In multiple page layout, View → Layout Mode → Multiple Page Layout the music is divided up into real pages much as it will be when printed. The size of each page is calculated so that approximately the same amount of music will fit on each line as it will when actually printed (according to the point size specified for the printing resolution in the configuration dialog). The printed version is unlikely to be exactly the same, as it depends on the precise paper size and margins in use when printing, but it should be fairly close if you happen to be using A4 paper. Most, but not all, of the display and editing functions work in the page layout modes as well as in linear layout. Rulers and cursorsThe Rosegarden notation editor window includes two graduated rulers, each associated with its own cursor. The rulers are the horizontal strips divided with tickmarks at top and bottom of the main notation canvas, and the cursors are the coloured vertical lines shown initially at the start of the top staff in the editor. In addition to these main two, there are the chord name ruler, the tempo ruler, and the raw note ruler. Note that the rulers are only shown in linear layout mode, and several of them are not displayed by default.
The purple cursor is the insert cursor. It shows the point at which operations such as insert and paste will take place. You can reposition the insert cursor by clicking or dragging on the top ruler, or by clicking with the select tool on an empty part of the staff (avoiding any events), or by clicking anywhere with Ctrl held down. You can also use the left and right arrow keys to move the insert cursor one event at a time. If you hold Ctrl while pressing the arrow keys, the cursor will move a whole bar at a time; if you hold Shift, the cursor will select the events as it passes over them. The blue cursor is the playback pointer. Just like the similar cursors in the main window and the matrix views, this shows the location of the current playback or record position, and it sweeps across the notation while the transport is rolling. It can be repositioned using the bottom ruler. The raw note rulerThe raw note ruler is particularly useful when editing quantized notation where the display duration on the page differs from the duration of the actual performance. Enabled via Settings → Rulers → Show Raw Note Ruler, it draws a small bar above each note, similar to the way notes appear in the matrix. In this example screenshot, you can see how interpreted, quantized notes appear on this ruler. The tenuto notes have full performance durations, while the staccato notes are considerably shorter, and the accented notes have a higher velocity (more red colour) than their neighbors. Raw note ruler marks only notes in the selected segment in the track. The colour of the selected segment is used in the background of the raw note ruler between the start and end time of the segment. The chord name rulerThe chord name ruler analyzes the tonality of the piece, and attempts to display which chords are sounding. This is for informational purposes only, and you can neither print nor edit the contents of this ruler. To actually write chords which will print see Chords in the section on text elements in a Rosegarden file. The tempo rulerThe tempo ruler displays the global tempo, and provides a vehicle for entering, editing, and manipulating it. It works the same way as the tempo rulers in the main window and the matrix editor. See Tempo Rulers for more information. Tools and selectionsMost of the menu and toolbar editing functions in the Rosegarden notation editor fall into one of three categories: “tools”, “functions that operate on selections”, and “drag operations”. Tools The basic tools are the selection tool F2, the erase tool F4, and those for inserting notes, rests, text and so on, which are usually accessed from the toolbar buttons.
Choosing a tool changes the default behaviour of the mouse buttons on the main notation canvas, at least until another tool is chosen instead. For example, choosing the selection tool allows you to make selections and so to use the selection-based functions (below); choosing an insertion tool (such as one of the notes) switches the GUI's behaviour so as to insert notes by clicking on the canvas; choosing the erase tool You can also change the current tool using the Tools menu. Functions that operate on selections The majority of the remaining menu functions require a selection to be made on the canvas before they can be used. Some of them (such as CutCtrl+X or the Note Style) will operate on any selected events; others (Stem Directions) will refuse to work unless the selection contains some notes.
To select some events on the canvas, switch to the select If you hold Shift while dragging out a rectangle, its contents will be added to any existing selection instead of replacing it. To select a whole bar, double-click with the select tool on some empty space within that bar; to select the whole staff, click three times. The Edit menu carries functions for selecting extended areas based on the location of the insert cursor, and you can also select events around the insert cursor by holding Shift and pressing the left or right arrow keys. It is not possible to select events from more than one staff at once. After selecting some events, you can filter your selection further using Edit → Filter Selection (Ctrl+F). For more details, refer to the corresponding function in the matrix editor. Drag operations
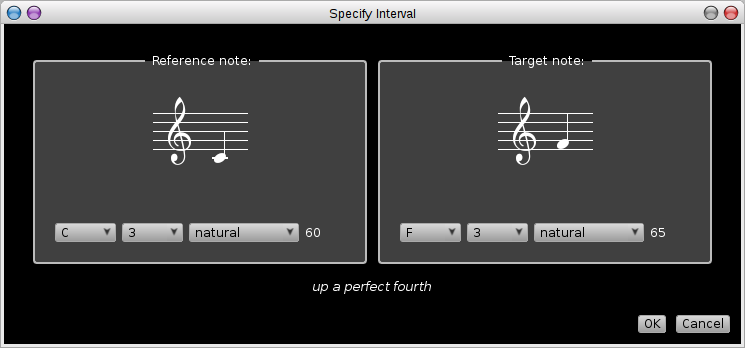
You can also do a certain amount of editing just by dragging things around. Switch to the select Dragging is usually a less accurate way of editing things than using the menu or toolbar functions, but it can be more intuitive. TransposingIn notation view menu there are two functions which can be used to transpose notes by an arbitrary interval, namely Adjust → Transpose → Transpose by Semitones which asks just the number of semitones to be transposed, and Adjust → Transpose → Transpose by Interval which shows a neat dialog that can be used to transpose notes. In the latter, the dialog shows an example notes before and after transposing and expresses the interval in written form. The interval may be changed either by dragging the notes shown by the dialog or by changing separately the base note, its octavation and accidentals. You can access the transpose by interval dialog in the notation and track (or default) view through Segment(s) → Transpose by Interval. Inserting notes and restsTo insert a note, select one of the note tools by clicking on a particular duration of note on the toolbar, and then click on the staff at the point where you want to add the note.
You can also select one of the accidentals on the toolbar to insert sharpened or flattened notes. If no accidental is selected, the note inserted will follow the key signature. Alternatively, you can select the If you add a note at the same time as an existing note of different duration, the editor will generally assume that you want to create chords and will split the existing or new note accordingly so as to create one or more chords with ties. If you really do want to chord two different durations, you can select the tied noteheads and use Adjust → Notes → Collapse Equal-Pitch Notes (Ctrl+=) to merge them together. Alternatively, the default behaviour can be changed in the Rosegarden configuration dialog so as not to do the split at all. If you add a note exactly over an existing note of different duration (i.e. at the same pitch), the duration of the existing note will be changed to that of the new one. If you add a rest at the same time as an existing note, the note will be silenced for the duration of the rest, shortening or possibly removing it altogether. Typing notes and rests with the PC keyboardDurationFirst, ensure a notation tool is selected to indicate the duration of note (or rest) you wish to insert. You can select the various note types using the number keys:
You can switch to a triplet version of the note duration by pressing the G key. Pressing it again will switch back to the normal duration. The status bar at the bottom of the window will notify you of when a triplet duration is active. PitchOnce a notation tool is selected, you can insert a note at the current position of the insert cursor by pressing one of the pitch keys:
Press the .key to toggle between dotted and undotted durations. Holding Shift while pressing a key will sharpen the note (except for Mi and Ti, which don't have sharpened versions) and holding Shift and Ctrl together will flatten it (except for Fa and Do). To enter notes an octave higher, use the corresponding keys on the next row up: Q, W, E, R, U, I, and O. Likewise to enter notes an octave lower, use Z, X, C, V, B, N and M. RestsTo insert a rest instead of a note, press P. Alternatively, you can use the T and Y keys to switch the current tool to a rest tool and back to a note tool again. ChordsThe default behaviour of the notation editor is to move the insert cursor forward after inserting a note, so as to be ready to insert another note after it in a melody; this can be changed using Tools → Chord Insert Mode (H), which switches to chord mode so that subsequent insertions occur at the same time as the last one. Pressing H again switches back to the melody insertion behaviour. Changing note durationsYou can use the keyboard to change the durations of notes that you've already entered. Make sure the notes you want to change are selected, and then press Ctrl plus the number key for the note you want. You can also add or remove dots, by pressing Ctrl+.— use this repeatedly to cycle between one dot, two dots and no dots. If you also hold Alt as well as Ctrl, you will change the durations of the notes as displayed in the notation editor without changing their performed durations. This can be very useful for tidying up a score: see also notation from performance data. Other remarksAll of the insertion commands are also available on a submenu of the Tools menu. It's unlikely you'd ever want to navigate the menus just to insert a single note, but the menus show the keyboard shortcuts and so provide a useful reference in case you forget which key is which.
The keyboard shortcuts are currently designed for use with a QWERTY-layout keyboard. There is not yet any way to remap the keys for another layout, short of reassigning each key individually using Settings → Configure Shortcuts…. Holding the Ctrl key while pressing a number will select the corresponding dotted-note tool. Entering notes using a MIDI keyboardYou can enter notes into the notation editor one at a time using a MIDI keyboard or other MIDI control device — a process known as step recording. The notation editor uses the pitches you play on the keyboard, but the durations you have selected in the editor itself.
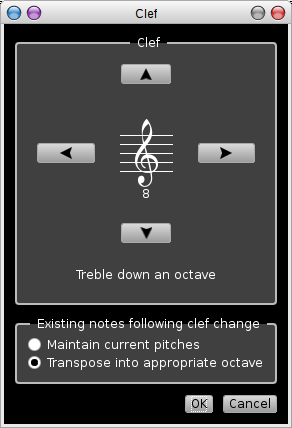
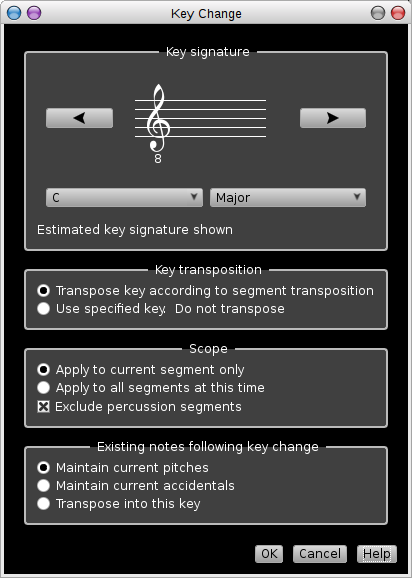
To start entering notes from a MIDI keyboard, first make sure the keyboard is configured as your default MIDI record device. Then make sure a notation tool is selected to set a duration. Then press the You can select another notation tool while step recording is in progress, in order to insert notes of different durations; and you can also switch into chord modeH to insert chords. Clef and keyThe first thing to know about the way Rosegarden handles these is that time-related changes (tempos and time signatures) are treated entirely differently from clefs and keys. In order to simplify managing playback and recording as well as notation, Rosegarden requires that when the tempo or time signature changes, it does so in all staffs at once. You can't have one staff in 2/4 and another in 6/8 simultaneously, or one staff playing at 120 to the beat and another at 90. This applies only to time: there is no such restriction on the use of clef and key changes. See also Tempo in Rosegarden. To change the clef, key, tempo or time signature within a notation editor window, position the insert cursor at the point where you want the change to happen, and use one of Segment → Add Clef Change…, Add Key Change…, Add Tempo Change…, or Add Time Signature Change…. You will then see a dialog box in which you can choose the particular clef, key, tempo or time signature setting you want to apply, as follows. ClefThe dialog allows you to choose a clef, but also to choose how you want the clef to be applied, in cases where there are already some notes following the point where the clef is to be inserted. You must choose one of the following: Maintain current pitches Any notes following the clef will keep their current performance pitches. For example, inserting a tenor clef in the middle of a previously treble-clef section will cause the notes following the clef to be moved an octave higher up the staff, because they will still have their treble-clef pitches. Transpose into appropriate octave Any notes following the clef will retain their pitch within the octave, but may be moved into a different octave to match the new clef, and therefore will play at a new pitch. For example, inserting a tenor clef in the middle of a previously treble-clef section will cause the notes following the clef to move by one staff line only to adjust to the new clef, but to play an octave lower than before. KeyThe dialog allows you to choose a key signature, but also to choose how you want the key signature to be applied. You must choose among the following: Key signature Used to dial up the actual key signature. The dialog will attempt to analyze the tonality of the piece, and guess at the key signature if no key is already in effect at that point in the notation. Key transposition You must choose whether to transpose the key according to segment transposition, or to use the key exactly as specified. For example, if you are inserting a key of Bb major into a transposed Bb trumpet part that's sounding at a transposition of -2, you use this option to tell Rosegarden whether the key of Bb you have entered should be written as a Bb (concert Ab), or should be transposed against the segment to result in the trumpet key of C major (concert Bb). Scope You must choose whether to apply this key signature to the current segment only, or to all segments, on all tracks, at this time. If you elect to apply the change to all segments at this time, the previous key transposition choice will govern whether all segments receive the specified key, or a key appropriately transposed segment by segment. This is a convenient way to deal with notation for transposing instruments, because it frees you to think of all keys in concert pitch, and allow Rosegarden to work out what key is used for what transposition. Existing notes following key change You must choose whether any existing notes following this key change will maintain their current pitches, maintain their current accidentals in the key, or whether Rosegarden should make an attempt to transpose the part into the new key. Text, Lyrics, and LilyPond directivesEditing lyricsUsing LilyPond directivesLilyPond directives are a special kind of text that you can use to export .ly files that take advantage of functionality not yet available directly through Rosegarden's own native interface. Some of these are a bit fiddly with respect to how their placement in time affects their function. It is not always immediately apparent at a glance just where they are, or what notes or barlines they will affect, so I have made placement suggestions to help ease the process of getting them in the right spot. These directives are: Segno Coda Alt1 Placed anywhere in a measure, designates that the measure(s) that follow this one should be exported as the first alternate ending (see file lilypond-alternative-endings.rg for example) Alt2 Placed anywhere in a measure, designates that the measure(s) that follow this one should be exported as the second alternate ending (see file lilypond-alternative-endings.rg for example) || → Placed anywhere in a measure, designates that the next calculated barline will be rendered as a double barline (see file lilypond-directives.rg for example) |. → Placed anywhere in a measure, designates that the next calculated barline will be rendered as a terminating barline (see file lilypond-directives.rg for example) : → Placed anywhere in a measure, designates that the next calculated barline will be rendered as a dashed barline (see file lilypond-directives.rg for example) Gliss. Placed by clicking directly on a notehead, draws a glissando between the target note and the note immediately following (see file lilypond-directives.rg for example) Arp. Placed by clicking directly on a chord, draws a wavy line arpeggio symbol immediately to the left of the affected chord (see file lilypond-directives.rg for example) Tiny → Placed anywhere, designates that notation immediately following this directive should be rendered at the “tiny” size (see file lilypond-directives.rg for example) Small → Placed anywhere, designates that notation immediately following this directive should be rendered at the “small” size (see file lilypond-directives.rg for example) Norm. → Placed anywhere, designates that notation immediately following this directive should be rendered at the normal size; usually used to cancel a Tiny → or Small →. (see file lilypond-directives.rg for example) Guitar Chords
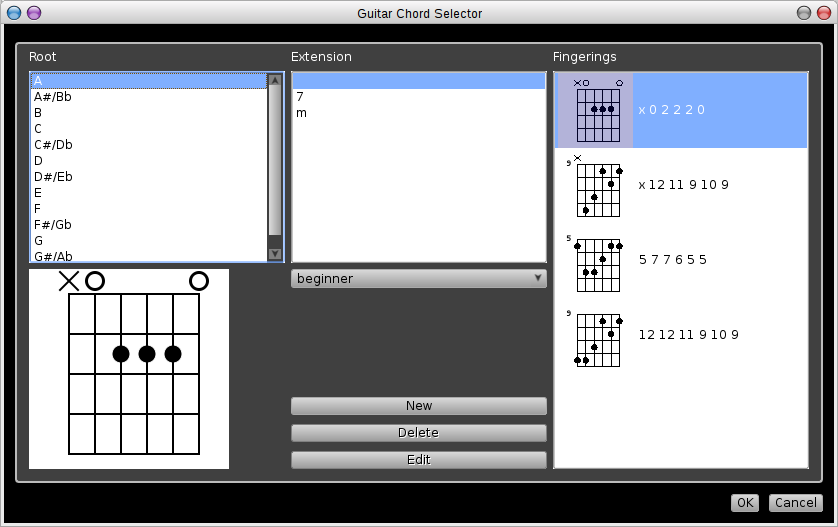
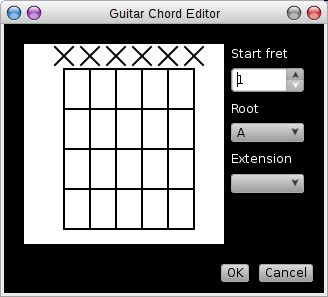
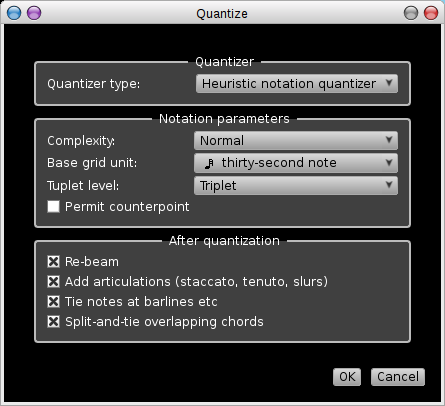
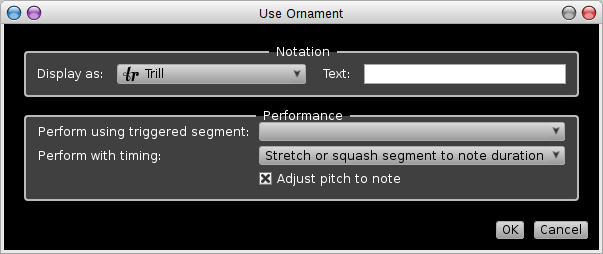
You can add guitar chord diagrams to a notation track (or edit previously added ones). You can do this by toggling the You may add your own fingerings if needed. To do this, click on the New button. This will pop up a chord editor, where you can “draw” which fingering you want to add, and specify its root, chord extension, and starting fret number. Note that while you can choose the extension from a list of predefined values, you can also type whatever value you want. However, in that case, the new fingering will only be available in the “all” list. You can only delete and edit your own chords. Those from the predefined dictionary cannot be changed. If you spot a mistake in one of them, please report it to the development team. Slurs and hairpinsSlur and hairpin (crescendo/decrescendo) dynamic markings are stored as events, just like notes or rests. To create one, select the area you want it to cover (a series of notes or whatever), and then use the Phrase → Add Slur ()), Phrase → Add Phrasing Slur (Ctrl)), Phrase → Add Crescendo (<) or Phrase → Add Decrescendo (>) options. Placement of hairpins can be somewhat tricky, and this is especially so with haripins that run in line with dynamic markings. It is commonly the case that a hairpin that doesn't quite look right in Rosegarden's own notation editor will nevertheless come out just fine once exported to LilyPond. Rosegarden's slurs generally come out best when all the stems are running in the same direction, and occasionally need to be repositioned by hand to achieve better placement. Slurs also tend to fare slightly better once exported to LilyPond. You can remove a slur or hairpin in the same way as any other event: either select it with the selection tool F2 and then hit Delete, or click on it with the erase F4 tool active. Note stems and slashesYou can set the stem direction of any selected notes (provided they are a sort that have stems) using the three stem direction options on the Notes menu. The options allow you to either fix the stems up Ctrl+Page Up or down Ctrl+Page Down , or revert to the stem direction that Rosegarden would otherwise have chosen. See also Beams. The Note → Marks menu also contains a selection of options for adding marks to annotate notes, such as slashes across note stems, for example to indicate short repeated notes or drum rolls. These are currently purely notational; Rosegarden will not take them into account when playing the staff or generating MIDI. BeamsAdding beams to notes is considered a grouping operation in the Rosegarden notation editor. Select the notes you want to beam, and use the Phrase → Beam Group (Ctrl+B) menu option. To remove a beam, select the notes and use Phrase → Unbeam (Ctrl+U). It is possible to have more than one beamed group happening at the same time — you just select and beam the separate groups one at a time — but Rosegarden is usually not clever enough to work out which notes should have stems up and which should have stems down for simultaneous beamed groups, so you will probably have to set the stem directions of the notes in the groups explicitly as well as beaming them. Rosegarden can attempt to guess a sensible beaming for a piece of music, provided it's not too complicated. To invoke this, select the notes you want to calculate the beaming for (for example by triple-clicking to select a whole staff) and then use Phrase → Auto-Beam. Auto-beaming is also done automatically when loading a MIDI file, for example, and the editor also does some automatic beaming as you enter notes. Note This can be disabled by changing the Auto-Beam on insert when appropriate setting on the Settings → Configure Rosegarden… configuration dialog on the Edit tab or the insertion tool's right-mouse menu. Triplets and other tupletsPaste typesAdjusting NotationAdjusting note and rest durationsNormalizing restsSometimes as a result of editing or quantization operations, a piece of notation can end up with incorrect rest durations for the current time signature. You can use Adjust → Rests → Normalize Rests (Ctrl+N) to fix these. This examines each sequence of consecutive rests found in the selection, and adjusts, splits and merges rests as necessary to ensure that the rests have theoretically correct durations and fall on the correct boundaries. For example, a 4/4 bar containing a crotchet (quarter-note), then a minim (half-note) rest and a crotchet rest will be rearranged to place the crotchet rest first, as the minim rest should not cross the central beat boundary of the bar. Splitting very long notesThe Adjust → Notes → Tie Notes at Barlines is intended to deal with notes that have excessively long durations, and therefore overflow barlines or are too long to be displayed as a single note. It takes any such notes and splits them into shorter, tied notes. Splitting overlapping notesAdjust → Notes → Split-and-Tie Overlapping Chords can be used to turn “counterpoint” notes into a series of split-and-tied notes and chords. It can be applied to a selection that contains overlapping notes. It will split overlapping notes at the point where they overlap, and tie together the resulting split notes, ensuring that the music takes the form of a series of chords and/or single notes starting and ending in neat blocks, with some notes possibly tied. Rescaling note durationsYou can use Adjust → Rescale → Halve Durations (Ctrl+H) and Adjust → Rescale → Double Durations (Ctrl+Shift+H) to perform the most simple rescaling. For more elaborate rescalings, use Adjust → Rescale → Stretch or Squash… with which you scale the total length of the selection. Repositioning notation elementsYou may occasionally wish to to nudge the positioning of some element of notation that Rosegarden's layout algorithm has not placed in an optimal location. Use Ctrl-click and drag or Alt right or left arrow to move slurs, hairpins, text events, and several other sorts of events. You may not reposition notes in this fashion. Interpreting Performance Cues in NotationNotation from performance dataRosegarden is a multi-purpose program: it is a notation editor, but it is primarily a sequencer and editor for performed music. And in performance, of course, the times and durations of notes are rarely as precise as they are on a printed score. This means that it's often desirable for Rosegarden to do a lot of tidying of the basic note times and durations when attempting to make meaningful notes to show in the notation editor. This is a kind of quantization, but a kind that requires a surprising amount of guesswork to do well. Rosegarden includes a quantizer designed to do a slightly better job of this than the plain grid quantizer. Applying quantization strictly for notation is rather unimaginatively referred to as “notation quantization”: it only applies to the notes you see and edit in notation, and doesn't affect the notes that play, or that you edit in other views such as the matrix. This quantization is automatically applied to music imported or recorded from MIDI, although not all of its possible capabilities are enabled by default. There are two ways to see which notes have been quantized for notation. By default, each notation view contains a raw note ruler (in the group of rulers above the score) showing a rectangular block for each note. This block is positioned so as to represent the time and duration of the note as performed, but with the top and bottom edges of the rectangle extended or shortened to represent the time after notation quantization. If this is too much information for you, you can choose in Settings → Configure Rosegarden… and choose the NotationLayout dialog to show in a green colour all note heads in the score that have had their timings altered by notation quantization. If the quantization Rosegarden has used is not suitable, either for the entire score or for a selection of notes, you can choose to use a different level of quantization or none at all. To apply a different quantization to some notes, select the notes and use theQ button and tick the box labelled Quantize for notation only on that dialog. The quantization level or type used by default can be changed in the configuration dialog as follows. Configurable parameters for the heuristic notation quantizerParameters for quantization itselfComplexity The “complexity” of a notation quantizer is its most fundamental parameter. A “complex” quantizer will be more prepared to accept that complex-looking music is in fact intended to be complex, whereas a “simple” quantizer is more likely to assume that complex-looking music results from an imprecise performance of simple music. The default setting is intended to produce reasonable results for a fairly wide range of music. Base grid unit The base grid unit (set to a note duration value) specifies the absolute minimum unit of note that will be permitted to remain in the score after quantization. For example, if set to a semiquaver, all notes will be placed on boundaries of a multiple of a semiquaver, with durations also a multiple of a semiquaver. The setting of the base grid unit is not quite as significant for a notation quantizer as it is for a plain grid quantizer, because all it does is impose an absolute limit on the level of precision permitted by the complexity parameter. Mostly, when you find a case in which increasing the grid unit produces better results, you've actually found a case in which the quantizer simply didn't do as good a job as it should have been able to with the smaller unit. Tuplet level The notation quantizer is capable of identifying tuplets (triplets and other time-squashed groups), within reasonable limits. This parameter controls how ambitious it will attempt to be when looking for tuplets, by setting a limit on how many notes per tuplet group it will attempt to identify. If it is set to “None”, the quantizer will not attempt to identify tuplets at all. Parameters that control tidying up after quantizationRe-beam Causes the notes to be re-beamed into groups appropriately after quantization. This is usually desirable. Add articulations (staccato, tenuto, slurs) Causes the quantizer to attempt to identify, based on the durations of individual and consecutive notes, which notes should be notated with staccato marks (for notes that fall significantly short of the following note, but not apparently short enough to merit a rest), tenuto (for notes that almost or just overlap the following note) and slurs (for series of notes that meet or overlap). Tie notes at barlines etc Causes any notes that are still found after quantization to overlap barlines or to have durations not exactly expressible with single note heads to be split into multiple notes appropriately, and tied. This has the same effect as applying Tie Notes at Barlines in the notation view. This parameter is not set by default because it changes the number of note events, which is undesirable when using Rosegarden partly or principally as a MIDI sequencer. Split-and-tie overlapping chords Causes overlapping notes to be split and tied, so as to make strict chords with individual noteheads tied as necessary. This has the same effect as applying Split-and-Tie Overlapping Chords in the notation view. This parameter is not set by default partly because it changes the number of note events, which is undesirable when using Rosegarden partly or principally as a MIDI sequencer. Playing ornamentsRosegarden supports playback of ornaments using its triggered segments mechanism. You can create triggered segments containing any of the various types of trill or ornament you might want, and associate them with the notes that want to play them. To create a new type of ornament, first write out the notes “in longhand” that you want the ornament to play, and then select the notes and use Note → Ornaments → Make Ornament…. This cuts the notes to the clipboard, pastes them into a new triggered segment, and replaces them with a single note of the same duration that triggers this segment. To make a note play an existing ornament, select it and use Note → Ornaments → Trigger Ornament…. To edit the notes played in a triggered ornament, you can double-click on the note that triggers it. This will change all uses of that ornament, not just the one that you double-clicked on. Note that while Rosegarden can shift triggered segments up and down in pitch to match their triggering notes, it is not clever enough to perform transposition into a different key or scale position. See triggered segments for more details about ornaments and other uses of triggered segments. Note stylesRosegarden also allows you to change various aspects of the way the various types of notes are drawn, such as the choice of note heads, the number of tails, whether notes are filled or unfilled and so on. A set of standard styles (Classical, Cross, Triangle and Mensural) is provided, and you can change the style used for individual notes by selecting them and then using Note → Note Style. Each note remembers which style has been chosen for it, and this information is saved as part of the composition. You can also change the default style for new notes using the Configure Rosegarden… option in the Settings menu. It is also possible to create your own note styles by describing them in XML files. (Even the standard styles are defined this way: the only reason the editor knows that a Classical semiquaver has a tilted oval filled head, a stem, two flags, etc., is that the description in Classical.xml says so.) See Customising Rosegarden for more information. Note fontsRosegarden is supplied with a single scalable notation font, the Feta font developed by the LilyPond project. Feta is an extremely high quality font that should be suitable for nearly all classical work. Rosegarden also includes support as standard for a number of other notation fonts. You will need to provide the fonts themselves in TrueType (.ttf) or PostScript Type-1 (.pfb, .pfa) format, and you will need the relevant permissions to install them to the same place as Rosegarden was installed. To install a supported notation font, locate the share directory for the Rosegarden installation (usually a subdirectory of the KDE desktop installation tree, such as /opt/kde/share/apps/rosegarden). You will find that this directory has a subdirectory called “fonts”: copy the font files into there, and restart Rosegarden. If your font is supported, it should now appear on the font menu in the notation editor. Complete or partial support is currently provided for the following fonts: Fughetta, by Blake Hodgetts; Petrucci, the “original” Finale font; Maestro, the “new” Finale font; Opus, the Sibelius font; Inkpen, the Sibelius jazz font; Sonata from Adobe; Steinberg, from the Cubase sequencer; and Xinfonia. (Most of the above font names are registered trademarks of the respective companies.) THE ROSEGARDEN TEAM MAKES NO REPRESENTATION AS TO THE LEGAL STATUS OF ANY USE OF THESE FONTS WITH ROSEGARDEN. It is your responsibility to ensure you are in compliance with the licence (if any) under which a font was provided to you, before attempting to use it. If you are not sure whether you have the right to use a font, don't: apart from anything else, the standard Feta font is better than most of these anyway. It is also possible to provide new mapping files so as to use new fonts. For some fonts that have similar mappings or metrics to fonts in the above list, this may be as simple as editing the name of the font in the mapping file. See Customising Rosegarden for more information.
6] You can also double-click on a single event to open an editing dialog for that event, but that's got nothing to do with selections. |


 (This no longer holds true)


