Table of ContentsPrefaceWe're moving to the wiki! As of Thorn, the Rosegarden Handbook will be maintained here on the wiki, and the help system will require Internet access. All the broken help menus and help buttons will refer here. Depending on how painful this whole conversion and editing process is, the rest of Rosegarden's documentation may follow suit. This would be a painful and arduous process if undertaken, but it might well be worth the pain in the long run. I'd like to move the entire text of Rosegarden Companion here, along with all the tutorials. This would require replacing hundreds of images, but all of the images are quite out of date anyway, and could do with freshening up. We'll do the Handbook first, which has the shortest text and the highest text:image ratio, and see how it follows from there. To get started, please see the Road Map The Rosegarden ManualCopyright © 2002-2009 the Rosegarden development team Editors:
Authors:
Rosegarden is an audio and MIDI sequencer and musical notation editor. This Manual describes how to use it. IntroductionAbout RosegardenRosegarden is a MIDI and audio sequencer and musical notation editor whose purpose is to serve as the sequencer of choice for users who prefer to work with music notation. Rosegarden allows you to record, arrange, and compose music, in the shape of traditional score or MIDI data, or of audio files either imported or recorded from a microphone, guitar or whatever audio source you care to specify. You can use Rosegarden to write, edit, and organise music to create a composition, which you can then synthesise, add effects to, and mix down for burning to CD or distribution on the web. Rosegarden also contains well-rounded notation editing support for high quality printed output via LilyPond. Rosegarden is designed to look and act in a manner familiar to experienced users coming from the commercial software world, while also being accessible and friendly to users new to music software generally. Rosegarden provides three distinct ways of viewing, editing, and entering MIDI events, including a powerful notation editor that provides many advanced features not typically found in the notation facility of MIDI sequencers. Underneath these three editors, Rosegarden provides a segment-based mechanism for arranging blocks of MIDI and audio data on a canvas that brings something akin to the flexibility of a layer-based image editing program to the realm of music. Rosegarden is built using Qt – A cross-platform application and UI framework. It uses ALSA to provide MIDI support, and JACK for audio, both of which limit Rosegarden to Linux for the time being, but that should hopefully change in the future, with OS-X being the next most accessible platform, and Windows the most difficult to reach. About this ManualThis manual summarises the capabilities of Rosegarden and provides a reference for some of the concepts involved. It's designed to make sense either read in order or used as a reference to the concepts and functions available in Rosegarden. If you would like to read a tutorial as well, you can find one here. If there's something else that you don't understand or require further help with, please visit the Rosegarden website for Frequently Asked Questions and mailing list instructions. About Menus and ShortcutsThis manual usually refers to the functions you can use in Rosegarden by describing where they live on the menus. For example, the function to add a single new track to the main track editor is Tracks → Add Track (Ctrl+T). In many cases, this is not the only way to reach a particular function. In this case the same function is also available through the keyboard shortcut, and it also appears as an icon on one of the main window's toolbars. Both the keyboard shortcut and the icon can quickly be learned, because they are shown on the menu in Rosegarden alongside the name of the function. You should bear in mind that although we always give the full menu location in this documentation for reference purposes, it's not necessarily the best or most usual way to use a function, and you should keep an eye on the keyboard shortcuts or toolbar icons as well. Note that a lot of tooltip are available to display contextual help. Optional FeaturesThis manual assumes that your Rosegarden installation supports all the features of which it is capable. Some of Rosegarden's features, including some very major ones, are actually optional when building a Rosegarden installation, depending on which other libraries and supporting code is available. For example, the whole audio subsystem is only compiled in if JACK libraries are available; synth plugin support depends on a number of other modules; etc. These dependencies are documented in the Rosegarden README and configuration documentation. If you find that this manual refers to features not visible in the version of Rosegarden you're using, consult your configuration documentation or distributor. Rosegarden Files and DocumentsRosegarden stores each composition in its own document, using its own internal format. When you save a document it is stored on disc as a file with the .rg extension. Rosegarden can also handle a number of other standard file formats. New compositionsWhen Rosegarden starts up, it does so with a new document, containing an “empty” composition ready to start editing. To put something in that composition, you must either record something, or create some blank lengths of music (referred to as “segments”) that you can then fill in using the various editing facilities. See Recording for details of how to record music, and see the Track Editor section for a description of how to create, edit, and manage segments of music. Using MIDI filesTo import and export MIDI files, use File → Import → Import MIDI File and File → Export → Export MIDI File. Although Rosegarden can load and save file formats such as MIDI, it does not store MIDI data internally. You should generally prefer to save files in Rosegarden's own format, as Rosegarden stores quite a lot of information that will be lost when exporting to MIDI. This also applies if you merely import a file, and then immediately export it back out. Rosegarden translates the raw MIDI to its internal format, and then translates that format back into MIDI. Some details of the file structure can and do get lost or rearranged in this translation, but the resulting performances should be functionally identical. When a MIDI file is loaded, Rosegarden splits out the music into one track per MIDI track or channel in the file and attempts to calculate plausible notation for the MIDI performance data. Rosegarden Project filesA Rosegarden composition file (.rg) contains all of the the note information for your composition, as well as other data such as MIDI controller settings, plugin details, and the names of any audio files referred to in your composition. The audio files themselves are not stored in the Rosegarden composition file; instead you are expected to keep track of their location on disk yourself (see Audio segments). When you need to transfer a project from one computer to another, or to a friend or colleague, this can be inconvenient. This is where Rosegarden Project files are useful. A Project file contains your composition, all of the audio files it uses, any further data files required for plugins used in the composition, and any additional files you may want to include, all in one big bundle. Use File → Export → Export Rosegarden Project file… to export the current composition and its associated data into a Rosegarden Project file, and File → Import → Import Rosegarden Project file… to expand a Rosegarden Project file back into a composition and load it. Note that Rosegarden Project format is an interchange format, not an archival format. Although Rosegarden composition files are very carefully checked for compatibility from one Rosegarden version to the next, no long-term guarantees are made for the Project file format. Other file formatsRosegarden can export to and import from a number of other file formats. Some of these are described here; see also Printing for information about LilyPond file export. CsoundYou can export score files for the Csound synthesis system using File → Export → Export Csound score file…. Together with a suitable orchestra file (not supplied), this can be used to play the composition through Csound. Note that not all data in the Rosegarden composition necessarily can or will be saved in the Csound format. MupYou can use File → Export → Export Mup file… to save the contents of the current composition into a new Mup file. This can then be processed by the Mup music publication system, although it is likely that the file may need some tweaking to get really good quality output. Note that not all data in the Rosegarden composition necessarily can or will be saved in the Mup format. MusicXMLFile → Export → Export MusicXML file… saves the contents of the current composition into a new MusicXML file. This can then be used with any music software that supports the MusicXML format. Note that MusicXML support is experimental and has not been well tested. Not all data in the Rosegarden composition necessarily can or will be saved in the MusicXML format. HydrogenRosegarden can import h2song files created by the Hydrogen drum machine. These are imported into a skeletal MIDI-style structure with one track per pattern. The audio samples they use are not imported. Use File → Import → Import Hydrogen file… to import a Hydrogen file. Merging filesPrintingYou can print out a composition in the form of a musical score, using File → Print. Producing a score from performance data is a hard task, and in most cases it's unreasonable to expect a default printout based on MIDI data to be very readable. You should use the notation editor to tidy up the score before printing. (See also Notation from performance data.) Rosegarden uses LilyPond as a back-end for printing scores. LilyPond is music typesetting software that reads a specialised text file format and produces high-quality typeset output. Rosegarden outputs LilyPond files that in turn are turned into pdf files for printing. Rosegarden has the ability to insert special exportable directives and track parameters that provide access to LilyPond features. There is also a collection of LilyPond options which is accessed from File → Print You can conveniently view the file produced with File → Print Preview, which exports the file into a temporary file and processes it directly with LilyPond for preview with a PDF viewer. If you are happy with the preview, you may print the score using the printing capability of the PDF viewer, or use File → Print. Printing : LilyPond optionsThe Track EditorOverviewRosegarden's main layout is similar to many other popular sequencers. It is based on a track structure — the main window shows a track editor with a list of tracks and their associated instruments down the left hand side. You can manipulate and move blocks of music data (referred to as “segments”) on the track editor as well as opening the segments themselves in specialised editors (notation, matrix, percussion matrix, and event list).
Tracks govern what sort of segment you can create in a particular place. If you create a segment on an audio track, it will be an audio segment, no matter where that segment subsequently moves. If you create a segment on a MIDI track, it will always be a MIDI segment. You can set track parameters to pre-select various segment properties at the track level, and to exercise fine control over MIDI recording. Tracks can be assigned to a range of MIDI, plugin synth, or audio instruments. In the picture above we see three segments in the track editor on tracks assigned to General MIDI instruments.
The button area to the left of the segment canvas shows you the track number, mute and record status, and the label of the track. You can mute or unmute a track by clicking on the blue LED-style button, and select a particular track as a record target by clicking on the yellow one. To change the track label, double-click on it.
Track labels are only shown if the View → Show Track Labels menu option is enabled. Otherwise, as in this picture, the instrument assignments for the tracks are shown instead Tracks and instrumentsEach track must have an instrument assigned to it, in order to be heard. By default the first 16 tracks are assigned to the 16 instruments of the first available MIDI device, and the next 16 tracks are assigned to audio. To change the instrument assignment for a track, right-click on the track label: a pop-up menu will appear from which you can select among all the available instruments.
An instrument can be understood as a single channel on a MIDI device, or as a mono or stereo audio output or an audio synth plugin. You should assign tracks containing note data to MIDI or synth plugin instruments, and those containing audio to audio instruments. You can assign more than one track to the same instrument, in which case the multiple tracks will produce sounds in the same way (MIDI tracks playing panned to the left with a flute, or audio tracks playing with the same volume levels, through the same stack of plugins.) You can change various properties of the instrument associated with a track using the Instrument Parameter Box. This is where, for example, you would set a MIDI instrument to use a particular patch and so produce a particular sound (piano, strings etc). See the Studio section for more about instruments. Creating segmentsTo create an empty segment, in order to begin composing something new, you need to use the pencil tool (which is normally the default active tool when you first start Rosegarden). Click on the pencil on the toolbar, and then click at the point where you want the segment to start (at the correct height for the track you want the segment to be on, and at a distance across the editor window corresponding to the correct time) and drag rightwards until the segment is the right number of bars long. You can also create segments using the Select tool, by clicking and dragging either with the middle mouse button, or with the left button and Ctrl held down. If you want to draw a segment longer than the visible portion of the canvas, the canvas will scroll automatically once you reach its edge. If you keep dragging past the end of the entire composition, you can keep dragging, and will push the end marker right along with you. (This is a welcome contrast to earlier versions of Rosegarden.) Usually each new segment starts on a barline and extends bar by bar, but this snap-to-grid effect can be prevented by holding down Shift while clicking and dragging. New segments are created in a yellow colour, with a treble clef by default. You may wish to jump ahead and have a look at track parameters to explore other possibilities. If you wish to draw a segment that begins in the middle of an existing segment, hold Ctrl+Alt when clicking. The track will automatically expand to accommodate this new segment. This is especially useful for some situations involving music notation. Once you have created a segment, you can then begin editing using the matrix, percussion matrix or notation editors. To use one of these editors, either double-click on the segment, or else click with the right mouse button and choose the editor you want from the context menu. If you are intending to record from a MIDI device or audio input, you don't need to create a new segment to record into first – each separate recording always goes into a new segment, created automatically during recording. Audio segmentsAn audio segment contains recorded or sampled audio data, instead of editable note-event data. Rosegarden allows you to record, play, arrange and split audio segments. To create an audio segment, you can record from an audio source onto a track assigned to an audio instrument, or you can work with existing WAV files. To do this, you need to use the audio file manager File → Manage Audio Files. While Rosegarden cannot edit audio waveforms on its own, it can launch the audio editor of your choice (e.g. Audacity) when you double-click on an audio segment. Be aware that making changes and exporting them over top of the original WAV file is destructive, so make backups and be careful. Also make sure you export in the format Rosegarden expects: 32-bit float. Otherwise you will hear some very unpleasantly loud noise. Manipulating segmentsThe main window contains a selection of “tools” for editing segments. These are available from the main toolbar: first select the tool you want from the toolbar, and then click and drag on the segments on the main canvas. The Select tool
The select tool The most obvious use is selection: select a single segment by clicking on it with the select tool, or select several by clicking with Shift held down, or by clicking in an empty area of the window and dragging out an area. To move segments with the select tool, simply click and drag on the segment. To create copies, click and drag with Ctrl held down. To resize a segment, click and drag on the right-hand edge of the segment. To create new segments, click and drag on an empty area either with the middle mouse button or with the left mouse button and Ctrl held down. The select tool doesn't replace the other tools completely though — sometimes you need to be more precise about which operation you intend, particularly when working on small segments. Move and Resize tools
To move a segment to a different start time or track, use the move tool
To resize a segment, use the resize tool For both move and resize you can hold Shift for fine positioning, to avoid snapping to a particular grid position. Stretching and squashing segmentsResizing a segment normally makes it shorter or longer by subtracting content or adding some extra space. However, by holding the Ctrl key while resizing, you can instead stretch or squash the contents of the segment. You can also do this by selecting the segment and then using Segments → Stretch or Squash…. For segments that contain MIDI events, this re-spaces the events so that they are spread across the new segment's duration, playing back faster or slower than before but in the same relative proportions. For audio segments, this time-stretches the audio, altering its played speed without altering its pitch (as would happen if the audio was simply played back faster or slower). Time-stretching usually adds some audible artifacts as well, so the quality of your results may vary. Rosegarden does not alter the original audio file when time-stretching an audio segment, and if you rescale the same segment repeatedly it will always work from the original file instead of accumulating timestretching artifacts with each rescale. You can rescale both mono and stereo audio. Split tool
You can use the split tool By default segments are split on the closest barline to the cursor, but this can be prevented by holding down Shift while splitting the segment. Other Split functionsThe Segments menu contains a number of other Split functions. Split on Silence Segments → Split → Split on Silence splits the selected segments on silences. This function works slightly differently depending on whether the selected segments contain audio or MIDI data. For audio segments, it offers you a dialog in which you can choose a threshold below which the segment is considered “silent”; it then splits the segment whenever its amplitude falls below this threshold. For MIDI segments, it simply splits the segment everywhere that a full bar of silence occurs. Split by Pitch Segments → Split → Split by Pitch… splits the currently selected segments into higher and lower parts. This function invokes a dialog allowing you to choose a pitch as a “split point”, and then splits the selected segments in half with all the notes on or above that split point in the “higher” segment and all the notes below it in the “lower”. If the music in the segment consists of two separate parts (e.g. left and right hand piano parts) that are not always completely on either side of a single split point, you may wish to select the “ranging split-point” option. If this is selected, Rosegarden will attempt to track the two parts as they move up and down, usually doing a slightly better job of separating out notes that were intended to lie in the two separate parts. The resulting segments are both created on the same track, with one overlapping the other. Split by Recording Source Segments → Split → Split by Recording Source… splits the currently selected segments according to the MIDI channel and device their events were recorded from. If you have recorded events from more than one MIDI channel or device into the a single segment, you can use this function to split them into separate segments afterwards. Select the channel or device whose events you want to split out, and the segment will be split into two segments, one containing events from the selected channel or device and the other containing the remaining events. The two segments are both created on the same track, with one overlapping the other. See also Recording and Track recording filters for more details on how to select the source MIDI channel or device for a recording. Split at Time Segments → Split → Split at Time… simply splits the currently selected segments into two parts at the time you specify. Tempo and Time SignatureTempo in RosegardenTempo rulersThe Rosegarden track editor, matrix editor and notation editor each contain a tempo ruler, which can be optionally displayed at the top of the editing area.
The tempo ruler shows changes to tempo and time signature throughout the composition, and can be used for editing tempo. To increase or decrease the tempo within the range of a single tempo change, click and drag the horizontal line (or sloped line, for ramped tempos) representing that tempo upwards or downwards. To insert a new tempo change, right-click on the ruler for a menu and select Insert Tempo Change. This will insert a new tempo change with the same tempo as the prior one, which you can then drag to increase or decrease. You can also click and drag the starting point of a tempo change left or right to move that tempo change to a different time, and you can click and drag the ending point of a tempo change up or down to make the tempo ramp gradually towards an ending tempo value. Double-click on the tempo ruler to open the tempo and time signature editor. Tempo and time signature editorMarkers, ranges, and loopsMarkersTriggered segmentsThe TransportWhen you play a composition, Rosegarden sweeps a playback pointer across the tracks from left to right playing the contents of the segments as it crosses them. The pointer's position on the screen is tracked and controlled by a window called the transport. Overview
If the transport isn't visible, you can activate it with View → Show Transport. The transport shows the time reached by the playback pointer, in seconds by default.
You can switch it to show musical time (bar and beat counts), musical time with a flashing visual metronome, or audio sample frame times, using the topmost of the small buttons
The button immediately below that The main controls on the transport start the sequencer playing and pause it, fast forward the pointer position, rewind it, stop it or jump to beginning or end of composition. The transport display also shows the tempo and time signature in effect at the current playback position. Double-click on either of these to insert a new tempo or time signature change. See Tempo and Time Signature for more ways to adjust these elsewhere in Rosegarden. You can also double-click anywhere on the main time display on the transport window, to enter a precise time that you want the playback position to be set to.
Additional controls and a MIDI event display are hidden on the bottom flap on the transport, which can be toggled on or off using the arrow button next to it at the left. Also on this extra portion there are buttons for recording, setting the loop start and end (see Ranges and loops), soloing individual tracks, turning on or off the metronome (see Metronomes), and silencing your MIDI devices (the panic button Recording
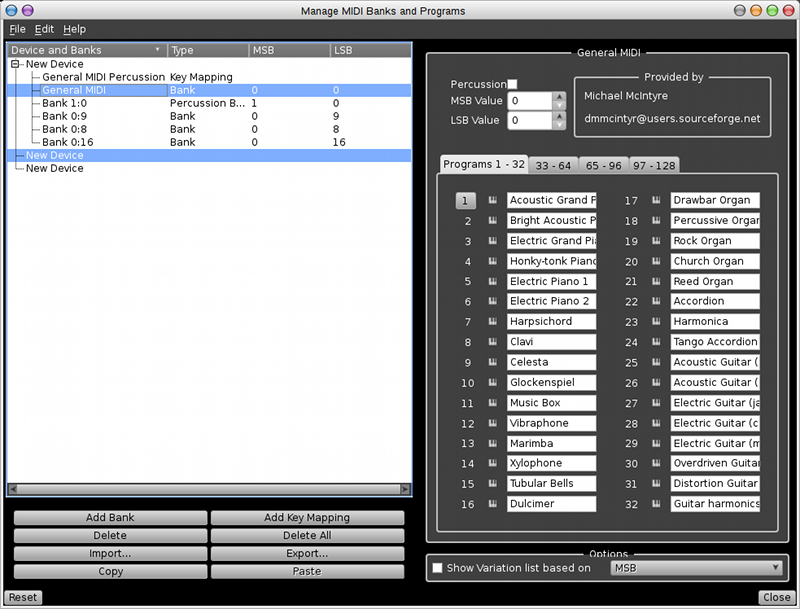
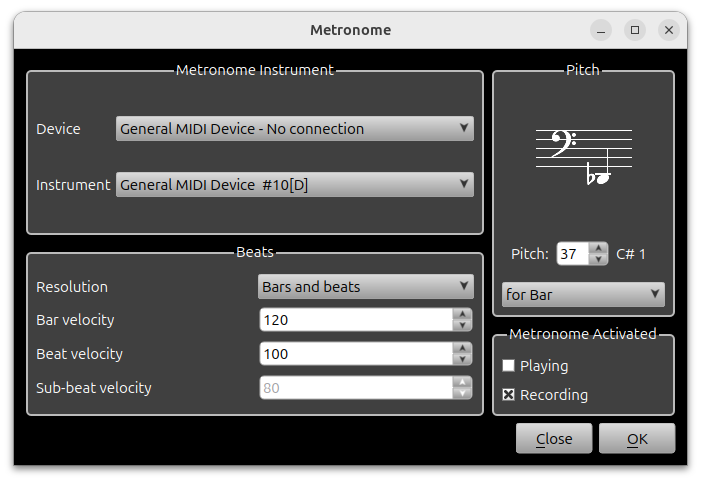
To record a new segment into a track, first make sure the right tracks are armed for recording by selecting the red (for audio tracks) or yellow (for MIDI tracks) LED-style buttons on the track labels, and then use the transport's record control. This has the effect of both starting the transport, thus playing the existing composition, and recording into the appropriate track, or tracks. You can record any number of MIDI and audio tracks at once so long as your computer is powerful enough, and you have enough disk space. Be careful not to accidentally leave tracks selected when you have finished using them and are trying to record somewhere else. Alternatively you can use punch-in record to separate the acts of starting the transport and entering record mode. Punch-in record is toggled with the Space bar. You can press Space while playing a composition to switch instantly between playback and recording without stopping the transport, or you can use Space to arm for recording when the transport is stopped, so that a subsequent “play” will in fact record as well. (The latter is handy when synchronising to an external transport.) If you record to MIDI tracks, you will record from the MIDI devices that are selected for recording in the MIDI device manager, as filtered through the track level recording filter and the global MIDI filters. If you record to audio tracks, your recording to each track will be from the input currently selected for that track's instrument in the instrument parameter box. This will either be an external audio input or an audio submaster or master (for performing mixdowns). If it's an external input, it will by default record from your soundcard's first available physical record in. You may wish to use a JACK connection tool to connect some other JACK audio application to the input instead. See also Audio Routing. Synchronising to external transportsJACK TransportRosegarden supports the JACK transport mechanism for synchronising its transport with other JACK applications on the same computer. To activate it, go to Settings → Configure Rosegarden… and check the Use JACK transport box. When the JACK transport is in use, all of the applications that are subscribed to it share a common transport control, and you can start, stop, and move the transport from any one of them. Many Linux audio applications that use the JACK audio server also support JACK transport: consult their documentation for details of whether and how. MIDI Time CodeRosegarden supports MIDI Time Code (MTC) synchronisation in master and slave modes. This is particularly useful for synchronising the Rosegarden transport with a hardware MTC-capable device, or with software running on other computers connected via MIDI. To make Rosegarden the MTC Master, so that it will control any MTC slave device or application connected to it, go to Edit → Preferences and in the MIDI page's MIDI Sync tab, select MTC Masterfrom the MIDI Time Code menu. To make Rosegarden an MMC Slave so that Rosegarden's transport will automatically be synchronised with incoming MMC events, select MMC Slave. Infrared Remote ControlsRosegarden supports infrared remote controls for almost all transport functions. In order to use it, you need either the internal LIRC client, which is an optional feature at Rosegarden's compile time, or the KDE IRKick application (KDE LIRC daemon) that you can find in your Linux distribution's repositories. In both cases, you need to install and configure the LIRC server daemon. The exact details depend on your remote control and receiver, and you should refer to the LIRC web site for more information. You can find more details online about the internal LIRC client configuration file and IRKick basics, at Rosegarden's web site. The StudioDevices, instruments and connectionsRosegarden uses the term studio to refer to everything it knows about the sound systems attached to the computer. This may include MIDI and audio hardware and other sound software, and includes information about connections, configuration, MIDI patches and so on. The studio is built-in to every composition you create with Rosegarden. Three pieces of terminology are essential here: Device A “device”, as far as Rosegarden is concerned, is simply something capable of producing sounds. This may be a MIDI or audio device. MIDI devices do not necessarily correspond directly to physical MIDI ports: they are just things with names that you can refer to, expected to work in particular ways. Configuration information such as MIDI patch maps can be attached to devices. Instrument Each device has a number of “instruments”, each of which is assumed to make a particular sound. These are the things that you can assign tracks to in order to choose which sound they play. By default, a device contains 16 instruments, created for you at startup: if the device is a MIDI device, then these will each be initialised to one of the 16 MIDI channels. The instrument is where you set all the properties of a particular voice, such as program settings, reverb, volume etc. Connection While a MIDI device is simply a name and a collection of configuration information, the “connection” specifies which MIDI port it is physically attached to. This can be configured in the MIDI device manager. (Audio and synth plugin devices do not have connections in the same way.) For example, imagine a setup consisting of a PC with two physical MIDI ports, one of which has an external synth attached to it. Here you would normally configure Rosegarden so as to have one MIDI device, corresponding to the synth. You could then configure this device with the correct name and patch map, and then specify a connection for it that corresponded to the relevant MIDI port on your soundcard. Each of the 16 default instruments on the device could then be configured with a suitable program, and you would then assign tracks to those. In practice, Rosegarden will by default create a device for each of the available connections on startup. So in the example above, two MIDI devices will be created by default even though you only need one. You would generally then rename and apply patch maps to the first, and delete or simply not use the second. Remember that there is no way for Rosegarden to know what synths you actually have plugged in to the MIDI ports on your computer: for this reason, the devices created at startup are just intended to be a default set, and it's up to you to ensure that the devices you configure match those you are really using. Once configured, the studio setup is stored with every Rosegarden-format file you save. Managing MIDI devicesManaging banks and programs for MIDI devicesAudio RoutingMIDI RoutingAudio Mixer WindowThe MIDI MixerAudio PluginsMetronomesRosegarden has two built-in metronomes, one for use during recording and one that can be switched on during normal playback. They work by sending notes to a MIDI instrument, and both metronomes use the same instrument, pitch and velocity information. To configure the metronomes, use Studio → Manage Metronome to bring up the metronome dialog.
Here you can select a MIDI instrument for the metronome and choose the metronome's resolution (whether it should tick once per beat, once per subdivision of a beat, or only once per bar), pitch, and velocities. Properties such as the actual voice the MIDI synth uses for the metronome tick depend on the instrument selected, just as the voice used for a MIDI track depends on the instrument that track is assigned to. You can configure the instrument by assigning a track to it on the main window and selecting the correct program from the instrument parameter box. The record and play metronomes can be switched on or off from the transport window, using the metronome button. This button controls the record metronome when recording is armed or in progress, and the play metronome at other times. By default, the record metronome is switched on and the play metronome switched off. Rosegarden also has a “visual metronome”: the transport window can be told to flash brightly to mark each beat. See the Transport section for more details. MIDI filtersExternal MIDI control surfacesSpecial ParametersThe Track Parameter Box
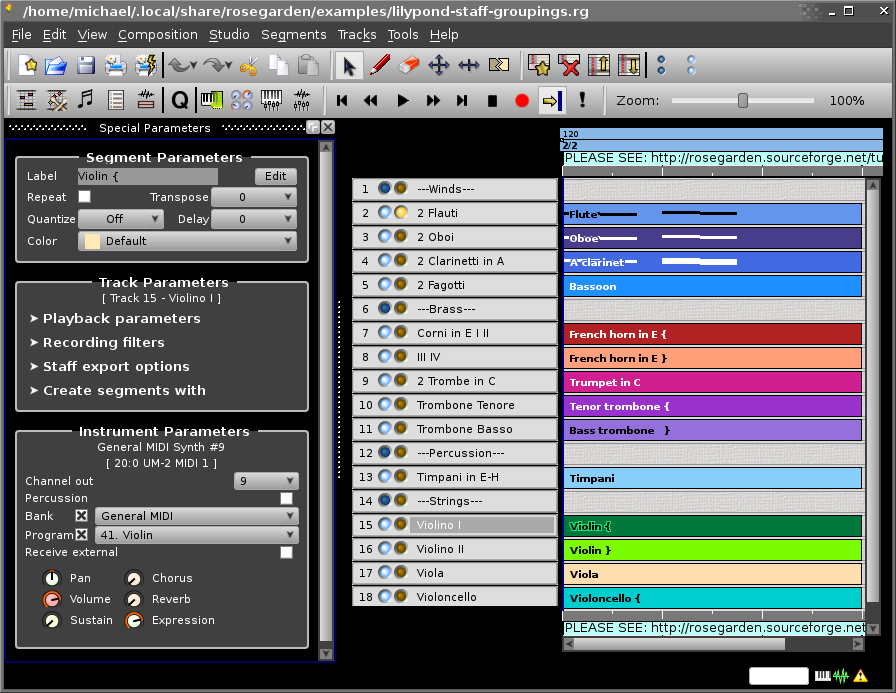
The track parameter box can be found at the left side of the Rosegarden main window. It displays the parameters for the currently selected track. If you can't see it, try using Settings → Show Special Parameters. It allows you to assign instruments to tracks, control what incoming MIDI data from which sources will be recorded to particular tracks, control staff attributes (currently only for LilyPond export,) make selections that govern how MIDI segments will be created for each track that is assigned to a non-audio instrument, and apply these selections to existing segments. For example when converting a trumpet part from an imported MIDI file to be represented as notation playable by a real human on a real instrument. This box is divided into four sections: Playback parametersThese provide an alternative mechanism to the menu-based system of instrument assignment. Track recording filtersThese provide you a way to control what events are recorded to this track. If you leave the default values “all” for both parameters, every received event will be stored in the track. This setting is safe and convenient if you are recording only one MIDI track. Otherwise, you should adjust one or both parameters to select only the desired events for the track. Device You can record from only one of the available devices marked for recording in the device manager, or from all of them simultaneously. Channel You can record from all channels, or limit recording to only one of the 16 available MIDI channels. In this case, only MIDI channel messages matching the channel number will be recorded, and system messages not having a channel (as system exclusive events) will be discarded. Both parameters are cummulative: you can filter only a device, only a channel, or both a device and a channel simultaneously. It is not mandatory to ensure mutually exclusive selections for all the armed tracks, but if you don't do so you will find duplicated events at several recorded tracks. The recording filters are also used to route MIDI events to the assigned track instrument when you are recording. Staff export optionsThese provide you with a means of exporting notation to render at either normal, small, or tiny size (eg for printing certain parts at cue size,) and allow you to export a variety of nested brackets. You are responsible for creating a series of bracket start and end markers that will yield a functional result, and if you make a mistake with these, it is likely that your file will not export or preview correctly in LilyPond. For a detailed, hands-on demonstration of brackets in action, please see this online tutorial. Create segments with
These provide you with a means of controlling many of the segment parameters for segments that don't yet exist. They are aimed especially at notation users, and they facilitate operations that require you to use more than one segment on a track (as when using repeats, or alternative endings), by allowing you to create a series of new segments that all have the same properties by default. Preset The Load button launches a dialog that allows you to pick a pre-defined collection of parameters that provide guidelines for how you should write parts for real-world instruments, and optionally convert any existing segments on this track to take on these new parameters.
You first pick a Category, then an Instrument, and finally choose whether you wish to write a part for an amateur or a professional player. The Scope controls allow you to choose whether these parameters will only affect segments that don't yet exist (which you will subsequently record, or draw with the pencil) or should convert any existing segments to take these parameters as well. (For a demonstration of the latter case in action, please see this online tutorial.) Clicking the OK button injects the appropriate parameters into the remaining widgets in this part of the track parameters box, where you can tweak them if you desire. Once you have loaded a preset, the name of your chosen preset will be used as the label for any segments you subsequently draw or record on this track, even if you change some or all of the associated parameters away from the values you just loaded. The preset database was compiled by Magnus Johansson, who deserves all the special mention we can muster for his outstanding effort on this. No facility is provided at this time for assembling your own database of presets, or customizing the existing ones in a permanent way. Clef This lets you choose the clef for any segments you subsequently draw or record on this track. Clefs are events, not properties. Your segments will be created with an initial clef event of the appropriate type (which you may subsequently alter or delete, should you have some occasion to do so.) The clefs available include a variety of named clefs representing standard clefs with various octave offsets. Transpose This causes segments on this track to be created so that their note events sound at a given transposition. Useful, especially, for writing parts for transposing instruments. Colour This causes segments on this track to be created using a given colour. Range The Low: and High: buttons, launch a dialog that allows you to pick a pitch using a staff. The lowest and highest pitches you select will then appear right on these buttons. These represent the lowest and highest playable notes, respectively, on the instrument for which you are writing notation. In some cases, these limits will be hard and fast, like the low B on a Transverse Flute (B foot). In others, they may only serve as guidelines to help you make good choices for instruments with which you are not intimately familiar. If you enter, record, or import data that has pitches exceeding the values specified, the note heads will appear in red by default. You can turn this behavior off with Preferences → Notation → Show notes outside playable range in red The Segment Parameter Box
The segment parameter box can be found at the left side of the Rosegarden main window. If you can't see it, try using View → Show Special Parameters. It allows you to modify some aspects of the selected segments. If a single segment is currently selected, its parameters will be shown in the segment parameter box and can be edited there. If several segments are selected, the parameter box will only show the current values where they are the same for all of the selected segments – but you can still edit them, and your changes will apply to the whole selection. Label Shows the label of the selected segment (or segments, if they all have the same label). Click the Editbutton to edit the label. Repeat Switches repeat on or off for the selected segments. A repeating segment will repeat until the start of the following segment on the same track, or until the end of the composition if there is no following segment. The repeated parts of a repeating segment are shown on the main canvas in a fainter colour than the original segment. You can turn them into real editable copies of the original segment either by using Segments → Turn Repeats into Copies, or simply by double-clicking on the individual repeating blocks. Quantize Shows the quantization setting for the selected segments. You can change this to quickly quantize the start times of all their notes. For more advanced quantization, use Segments → Quantize…. See Quantization for more details. Transpose Shows the transposition (in semitones) currently applied to the selected segments. This transposition is applied when the segment is played, and is not shown in the notes displayed in the matrix, notation or event list editors. You can use this to quickly change the pitch of part or all of a composition, and it is commonly used with segments containing notation written for transposing instruments, such as the clarinet. Delay Shows the delay currently in effect on the selected segments. You can set a delay here in order to cause an entire segment to play later than written. This delay is applied when the segment is played, and is not shown in the notes displayed in the matrix, notation or event list editors. You can set a delay either in musical time (by choosing a note duration from the delay dropdown), in which time the exact delay will depend on the tempo, or in real time (by choosing a time in milliseconds from the dropdown). Colour Shows the colour being used for the display of the selected segments. You can choose another colour from the dropdown, or choose the “Add New Colour” option at the very bottom of the list of colours if you want a colour not in the dropdown.
The Instrument Parameters BoxQuantization“Quantization” is the process of repositioning notes and other events so that they start or finish on exact beat divisions. It is traditionally used to make an approximate performance into a precise but rather mechanical-sounding one – either because precision is the desired effect, or for reasons such as making the notes clearer in notation. For general quantization, use Segments → Quantize (=) in the main window or Adjust → Quantize in matrix or notation editors. This shows you a dialog in which you can select the precise quantization parameters you need, and then it applies these to all of the selected segments or notes.
The quantize dialog offers a selection of quantizers, each with its own set of parameters. The quantizers available are: Grid quantizer The grid quantizer moves the start times of notes so that they start at the nearest point on some grid (defined by various parameters of the quantizer). Thus notes that initially vary slightly in start time will be aligned by the quantizer, making for a more precise and mechanical performance. Legato quantizer The legato quantizer carries out a simple grid quantization, and also adjusts the note durations so as to remove any gaps between notes by extending each note so as to (at least) continue until the start of the following one. You can also obtain this legato effect without the accompanying grid quantization using Adjust → Quantize → Legato (-) in the matrix editor. Heuristic notation quantizer The notation quantizer attempts to adjust note start times and durations so as to produce readable notation. See Notation from performance data for a description of this quantizer and its uses. The grid quantizer has the following adjustable parameters: Base grid unit This is the size of the grid used for quantization. Swing This is a percentage figure which adjusts the degree by which alternate beats are quantized “late”. If set to None (the default), quantization will be to an even grid spaced according to the base grid unit. If set to 100%, every second grid line will be placed two-thirds of the distance between the previous and next ones, instead of only half. This will result in notes being quantized to the first and third triplets of a swing beat. Other settings will produce proportionately varying degrees of swinginess. You can also set this parameter to negative figures (for alternate beats to start early) or to figures greater than 100%. Iterative amount The default behaviour of the grid quantizer is to move each note exactly onto its nearest grid line. But if you set the iterative amount to something less than 100% (the “Full quantize” default), each note will only be moved that percentage of the distance toward its nearest grid line, resulting in a nearly-but-not-quite quantized effect. This quantizer may be applied repeatedly so as to try out gradually increasing degrees of quantization, hence the name “iterative”. Use Adjust → Quantize → Repeat Last Quantize (+) in the Matrix editor to do so. Quantize durations as well as start times If this option is enabled, the quantizer will quantize the notes' end times to the same grid as their start times. The quantize dialog also has an optional Advanced section containing further options for notation quantization. Another simple way to apply a grid quantizer is to do it in the main window, using the Quantize menu on the segment parameter box. If you select some segments and change the value shown in the menu, the segments will immediately be grid-quantized to the resolution shown in the menu. Finally, there is also a quantize control in the matrix view. The Matrix editorThe Percussion Matrix editorThe Percussion Matrix editor is identical to the Matrix editor, except that it shows pitch names on the vertical scale instead of a piano keyboard, and it does not show the duration for each note. It can be found under Segments → Edit With → Open in Percussion Matrix Editor (D). This is intended for use with percussion programs on MIDI instruments, in which each note pitch plays a different percussion sound.
The pitch names are only shown if the segment being edited is playing through a percussion instrument that has an associated key mapping to define the names; otherwise the standard matrix view piano keyboard will appear instead. See Percussion Key Mappings for more information about key mappings. The Notation editorThe Event List editorCustomising Rosegarden |


")


 : I can't find the reference to alternative endings SOM


