Table of ContentsThe Rosegarden マニュアルCopyright © 2002-2009 the Rosegarden 開発チーム 編集者:
著者:
Rosegardenはオーディオとシーケンサと楽譜エディタです。このハンドブックはどのようにこれを使うかを説明します。 Rosegarden についてRosegardenは、楽譜で仕事をすることを好むユーザの為の、シーケンサの選択肢として提供される、MIDIとオーディオシーケンサと楽譜エディタです。Rosegardenは音楽の録音、編曲と作曲ができます。また、従来の楽譜かMIDIデータ、あるいは指定した任意の音源かギターかマイクからの入力で録音されたものか、一連のオーディオファイルからインポートされたものを処理できます。Rosegardenを、シンセサイズしたりエフェクトを追加することができる、コンポジションの作成のために、書き込み、編集と音楽の編集のために使うことができ、CD書き込みのためのミックスダウンかWebへの公開にも使うことができます。Rosegardenはまた、LilyPond経由による高品質の印刷出力のために、調和のとれた楽譜編集機能を含んでいます。 Rosegardenは、商用ソフトウェアを使用していた経験者にとって、見栄えと動作が親しみやすいように設計され、また、一般的に、新しいユーザにとって、アクセスしやすく、親しみやすいようになっています。 Rosegardenは三つの異なった、表示方法、編集方法とMIDIイベントの入力方法を提供し、それらにはMIDIシーケンサの音符機能中に通常は提供されていないような、たくさんの高度な機能を提供する、強力な譜面エディタを含んでいます。これらの3つのエディタの配下で、Rosergardenは、音楽の領域に対して、自由度のあるレイヤベースのイメージ編集プログラムと同等のようなものを提供するキャンバス上で、MIDIとオーディオデータのブロックを調整するための、セグメントベースの機能を提供します。 RosegardenはQt –クロスプラットフォームアプリケーションとユーザインタフェースフレームワークを使って構築されています。また、これは、MIDIサポートのためにALSAを、オーディオサポートのためにJACKを使っていますので、現時点でRosergardenはLinux上でのみ動作しますが、将来的にはこれは改善される予定で、OS-Xが最有力候補ですが、Windowsへの移植は最も難しいでしょう。 このマニュアルについてこのマニュアルは、Rosegardenの機能概要を要約し、参照を必要とする概念のいくつかを提供します。これはRosegarden中で有効な機能とコンセプトに対するリファレンスとして使うか、そのように読むように、意味をなすように設計されています。チュートリアルをよく読みたいのであれば、you can find one hereにあります。 もしも、何らかの点で、理解できないことがあるか追加してもらいたいヘルプがあるならば、RosegardenウェブサイトのFAQとメーリングリストの説明を見てください。 メニューとショートカットについてこのマニュアルでは、通常メニュー上に存在する記述によって、Rosegarden中で使うことが出来る機能を参照します。たとえば、メイントラックエディタで新しい1つのトラックを追加する機能は、トラック → トラックの追加(Ctrl-T) (Tracks → Add Track (Ctrl+T)) です。 多くの場合、これは特定の機能に到達する唯一の方法ではありません。この場合、キーボードショートカットを使った同じ機能が有効で、また、メインウィンドウのツールバー中の1つのアイコンとしても提供されています。キーボートショートカットと アイコンの両方は、機能の名前がRosegardenのメニューと一緒に表示されているので覚えるのに簡単です。参照目的のために、この文書は、全部のメニュー位置を常時提供していますが、それが その機能を使うのに必ずしも最適か、よりよい方法ではない事を心に留めておく事は必要で、キーボードショートカットやツールバーアイコンも同様に、注目しておかなければなりません。 多くのツールチップが、ディスプレイ上でのバルーンヘルプとして提供されていることに注意してください。 オプションの機能このハンドブックは、インストールしたRosegardenが持てる全ての機能をインストールされていることを仮定しています。いくつかの、非常に重要なものを含むRosegardenの機能は、実際には、選択可能な機能であり、Rosegardenのインストールを実行するときに、他のライブラリとサポートコードに依存しています。例を挙げると、全てのオーディオサブシステムは、JACKライブラリが有効であるときに、コンパイル時に組み込まれます。同様に、シンセサイザープラグインサポートは、数多くの他のモジュールに依存するなどです。 これらの依存性は、Rosegarden;のREADMEと設定ドキュメントに記載されています。もしも、このマニュアルが参照する機能が、使ってるRosegardenのバージョンで見つからないのであれば、設定ドキュメントを見るか、ディストリビュータに相談してください。 Rosegardenのファイルとドキュメントの基礎Rosegardenは各々のコンポジション情報を、固有のドキュメントに、固有の内部形式で格納します。ドキュメントをセーブするとき、ディスク上に、 .rg 拡張子を付けたファイルとして格納されます。Rrosegardenは、いくつかの、その他の標準的なファイル形式も扱うことができます。 新しいコンポジションRosegardenの起動時には、編集を行なうための、“空白の”コンポジションを含む新しいドキュメントを開きます。そのコンポジションに、なんらかのもの を配置するために、何らかを録音するか、色々な編集機能を使って埋めることができる、長さ0(空白)の音楽(“セグメント”として参照される)を作成する必要があります。 どのように音楽を録音するかについての詳細は、録音の節を、音楽セグメントを、どのように作成、編集、操作するかについての詳細はトラックエディタの章を参照してください。 MIDIファイルを使うMIDIファイルをインポート/エクスポートするには、ファイル→インポート→MIDIファイルのインポート(File → Import → Import MIDI File)と、ファイル→エクスポート→MIDIファイルファイルのエクスポート(File → Export → Export MIDI File)を使ってください。 RosegardenがMIDIファイルのようなファイル形式をロード/セーブできるにもかかわらず、内部的にはMIDIデータを格納しません。一般的には、RosegardenがMIDIにエクスポートするときに失われる大量の情報を格納するRosegarden固有の形式でのセーブを選択する必要があります。これは単にファイルをインポートし、またもとにエクスポートする時にも適用されます。Rosegardenは生のMIDIを内部形式に変換し、次に、そのフォーマットをMIDIにもどします。ファイル構造に関するいくつかの詳細は、この翻訳中では失われたり、再構成されますが、結果として生じるパフォーマンスは機能的に同一でなければなりません。 MIDIファイルがロードされるとRosegardenは音楽データを、ファイル中のMIDIの1トラック単位に1つのトラックかチャンネルに分割し、MIDIパフォーマンスデータのために、適切な楽譜に仕立て上げようとします。 Rosegarden プロジェクトファイルRosegardenのコンポジションファイル(.rg)には、コンポジション内すべての音符情報が、他のデータ、たとえば、MIDIコントローラの設定、プラグインの詳細とコンポジションが参照する任意のオーディオファイルの名前などと同様に含まれています。オーディオファイルそれ自身はRosegardenコンポジションファイル内には保存されません。その代わりに、ディスク上でのそれへの位置を保持しておくことが要求されています(Audio segmentsを参照してください)。プロジェクトを1つのコンピュータから他に、あるいは友人や同僚など移動する必要がある時、これは便利です。これがRosegardenプロジェクトファイルが便利なところです。プロジェクトファイルは、コンポジション、それが使うすべてのオーディオファイル、コンポジション中で使うプラグインのために要求されるデータファイルと、一緒にしておくことを望んでいる任意のファイルを、すべて1つの大きな束にして含んでいます。 現在のコンポジションとそれに関連するデータをRosegardenプロジェクトファイルにエクスポートするためには、ファイル→エクスポート→Rosegardenプロジェクトファイルのエクスポート…(File → Export → Export Rosegarden Project file…)を使い、Rosegardenプロジェクトファイルを、コンポジション中に展開ロードするためには、ファイル→インポート→Rosegardenプロジェクトファイル…(File → Import → Import Rosegarden Project file…)を使います。 Rosegardenプロジェクトフォーマットはデータ交換用のフォーマットであり、アーカイブフォーマットでないことに注意してください。Rosegardenコンポジションファイルは、あるrosegardenバージョンから次のバージョンへの互換性を注意深く考慮してあるにもかかわらず、プロジェクトファイルフォーマットに対しては長期間の保証はされていません。 他のファイル形式Rosegardenはいくつかの他のファイルフォーマットをエクスポートしたりインポートできます。それらのいくつかは、ここで詳細を記しています。Lilypondファイルのエクスポートについての情報は、印刷も参照してください。 CsoundCsoundシンセサイズシステムに対するスコアファイルのエクスポートは、ファイル→エクスポート→Csoundスコアファイルのエクスポート….(File → Export → Export Csound score file….)を使います。適合するオーケストラファイル(サポートされていない)と一緒にするために、これは、Csoundを通してコンポジションを演奏するために使う事が出来ます。Rosegarden中に必要とされるすべてのデータはCsound形式にセーブされないことに注意してください。 Mup現在のコンポジションの内容を新しいMupファイルにセーブするためには、ファイル→エクスポート→Mupファイルへのエクスポート…(File → Export → Export Mup file…)を使う事が出来ます。これは、ファイルが本当によい品質の出力を得るために、何らかの微調整が必要かもしれない可能性があるにも関わらず、Mup音楽パブリッシングシステムによって処理する事が出来ます。Rosegarden中に必要とされるすべてのデータはMup形式にセーブされないことに注意してください。 MusicXML現在のコンポジションの内容を新しいMusicXMLファイルにセーブするためには、ファイル→エクスポート→MusicXMLファイルへのエクスポート…(File → Export → Export MusicXML file…)を使う事が出来ます。これにより、MusicXML形式をサポートする任意の音楽ソフトウェアでの利用が可能になります。MusicXMLのサポートは実験的であり、よくテストされていないことに注意してください。Rosegarden中に必要とされるすべてのデータはMsicXML形式にセーブされないことに注意してください。 HydrogenRosegardenはHydrogenドラムマシンによって作成されたh2songファイル形式をインポートできます。これは、パターンに付き1つのトラックという骨格だけのMIDIスタイルの構造でインポートされます。それが使うオーディオサンプルはインポートされません。Hydrogenファイルをインポートするには、ファイル→インポート→Hydrogenファイルのインポート…(File → Import → Import Hydrogen file…)を使います。 ファイルの併合印刷ファイルメニュー中の“印刷”機能を使うことで、楽譜としてコンポジションを印刷することができます。これは、ファイル→印刷(File → Print)を使います。 楽譜を演奏データから作成することは大変な作業なので、ほとんどの場合、MIDIデータに基づく既定値の印刷結果がとても読みやすいことを期待するのは無謀である。印刷する前に、楽譜を譜面エディタを使って整形すべきです。 Rosegardenは楽譜の印刷のために、バックエンドとしてLilyPondを使います。LilyPondは楽譜タイプセッティングソフトウェアで、特別なテキストファイル形式を読み込み、高品質の活字化された楽譜を生成します。Rosegardenは特別なexportable directives と トラックパラメータを挿入する機能を持ち、それはLilyPond機能へのアクセスを提供します。また、ファイル→印刷(File → Print)からアクセス出来るひとまとまりのLilyPondオプションもあります。 Printing : LilyPond オプショントラックエディタ概要Rosegardenのメインレイアウトは、その他の一般的なシーケンサとよく似ています。これは、トラック構造 - メインウィンドウはトラックの一覧があるトラックエディタを表示し、そのトラックが、左側の下のインストゥルメントに関連付けられている - を基盤としています。特別なエディタ(譜面、マトリクス、パーカッションマトリクスとイベントリスト)中で、セグメントそれ自身をオープンするのと同じように、トラックエディタ上で(“セグメント”として参照される)音楽データのブロックを移動したり操作することができます。
トラックは、特定の場所で作成する事の出来るセグメントの種類を決めます。もしも、オーディオトラック上でセグメントを作成したならば、それはオーディオセグメントであり、その後どこに移動してもそれはそのままです。もしも、MIDIトラック上でセグメントを作成したならば、それは常時MIDIセグメントです。トラックパラメータにより、トラックレベルで種々のセグメントプロパティをあらかじめ設定することができ、MIDIレコーディング上での詳細なコントロールができます。 トラックは、MIDIのレンジや、プラグインシンセサイザ、オーディオインストゥルメントに割り当てることができます。上記の画面の中では、トラックエディタ上で3つのセグメントが表示されていて、 それはGeneral MIDIに割り当てられています。
セグメントキャンバスの左のボタン領域はトラック番号、ミュートと録音ステータス、トラックのラベルを表示しています。青色のLED風のボタンをクリックすることで、トラックのミュート状態を設定でき、赤いボタンをクリックすることで、特定のトラックが録音ターゲットかどうかを選択します。トラックラベルを変更するには、それをダブルクリックします。
トラックレベルは、もしも、設定→トラックレベルの表示(Settings → Show Track Labels)メニューオプションが有効の場合に表示されます。その他の場合は、この図では、その代わりにトラックに対するインストゥルメントの割り当てが表示されています。 トラックとインストゥルメント各々のトラックは、音を鳴らすために、それに割り当てられているインストゥルメントを持たなければなりません。規定値では、最初の16トラックが最初に有効なMIDIデバイスの16インストゥルメントに割り当てられ、次の16トラックがオーディオに割り当てられます。 トラックに対するインストゥルメントの割り当てを変更するためには、トラックラベル上で、右クリックを行います。選択できるところからポップアップメニューが現れ、有効なすべてのインスツルメントがそれに添って表示されます。
インストゥルメントは、MIDIデバイス上の1つのチャネル、あるいはモノ又はステレオのオーディオ出力か、オーディオシンセサイザープラグインとして理解することができます。MIDIに対する音符データかシンセサイザープラグインインストゥルメントを含み、それらがオーディオからオーディオインストゥルメントを含んでいるトラックを割り当てるべきです。1つ以上のトラックに同じインストゥルメントを割り当てることができ、その場合、複数のトラックは同じ方法で音を生成します(MIDIトラックはフルートを伴って左にパンするか、プラグインの同じスタックを通して同じボリュームレベルでオーディオトラックを演奏します)。 インストゥルメントパラメータボックスを使うことで、トラックに割り当てられた色々なプロパティを変更することができます。ここは、たとえば、特定のパッチを使って特定の音(ピアノ、ストリング、その他)を出すためにMIDIインストゥルメントを設定するところです。 インストゥルメントについてのより詳細は、スタジオの節を参照してください。 セグメントの作成何らかの作曲を開始するため、1つの空白のセグメントを作成するためには、鉛筆ツールを使う必要があります(それは最初にRosegardenを起動したとき、通常規定値として、アクティブなツールとなっています)。ツールバーの鉛筆をクリックし、(セグメントを作成したい場所において、正しい高さで、エディタウィンドウをまたがった、正しい時間距離で)セグメントを開始したい場所でまたクリックし、正確な小節の数に、セグメントがなるまで、右方向にドラッグします。 真ん中のマウスボタンか、Ctrlを押しながら、レフトボタンのどちらかをクリックし、ドラッグすることにより、選択ツールを使う事によってセグメントを作成する事も出来ます。 もしも、キャンバス上の見えている範囲よりも長いセグメントを描画したい場合、キャンバスは、その端に来ると、自動的にスクロールします。もしも、全体のコンポジションの終端を過ぎてドラッグし続けた場合、そのままドラッグすることができ、それに沿って終端マーカが押し込まれます(これは、以前のバージョンのRosegardenと比べて良い対比になります)。 通常、おのおのの新しいセグメントは小節線上で開始し、小節単位で拡張されますが、この、格子にスナップする効果は、クリックし、ドラッグしている間、Shiftキーを押すことによって抑止されます。 新しいセグメントは、黄色で作成され、既定値ではト音記号が使われます。その他の可能な値を調べるために、トラックパラメータの所に飛んで、それを見ても良いでしょう。 もしも、存在するセグメントの真ん中で始まるセグメントを書きたいならば、クリックする時にCtrl+Altを押します。トラックは自動的にこの新しいセグメントの適切な所に拡張されます。これは特に楽譜を訂正するような場合に特に便利です。 一度セグメントを作成すると、次に、マトリクス、パーカッションマトリクスか譜面エディタを使って編集することが出来ます。それらのエディタのどれかを使うためには、セグメント上でダブルクリックするか、右マウスボタンをクリックし、コンテキストメニューから使いたいエディタを選びます。 もしも、MIDIデバイスか、オーディオ入力からの録音に興味があるならば、最初に録音のための新しいセグメントを作成する必要はありません - 各分離された録音は常時新しいセグメントに入り、それは、録音中に自動的に生成されます。 オーディオセグメントオーディオセグメントには、編集可能なノート-イベントデータの代わりに、録音された、あるいはサンプリングされたオーディオデータが含まれます。Rosegardenは録音、再生、編集と、オーディオセグメントの分割が出来ますが、オーディオの波形編集機能は持っていません。 オーディオセグメントを作成するためには、オーディオセグメントとして割り当てられたトラック上で、オーディオソースから録音を選ぶか、存在するWAVファイルを使う事が出来ます。これを行うためには、ファイル→オーディオファイルの管理(File → Manage Audio Files)でオーディオファイルマネージャを使わなければなりません。 セグメントの操作メインウィンドウはセグメントを編集するための“ツール”のうち、いくつか選ばれたものが用意されています。それらはメインツールバーで有効になっています。最初にツールバーから使いたいツールを選択し、メインキャンバス上のセグメント上にクリックとドラッグを行ないます。 選択ツール
選択ツール 最も明白な使用方法は“選択”です:これは、選択ツールで、単一セグメントを、セグメント上でクリックして選択するか、Shiftキーを押したまま、複数のものをクリックして選択するか、ウィンドウの空白の領域中でクリックして領域をドラッグします。 選択ツールでセグメントを移動するためには、単にクリックし、セグメントをドラッグします。コピーを作成するためには、Ctrlキーを押しながら、クリックとドラッグします。セグメントの大きさを変える場合には、クリックしてセグメントの右端までドラッグします。新しいセグメントを作成するためには、中マウスボタンで空白の領域をクリックしてドラッグするか、Ctrlキーを押しながら左マウスボタンを押すかのどちらかを行います。 選択ツールは完全に他のツールを置き換えるものではありません - 時々、特に小さなセグメント上で作業する場合、意図している動作についてより明確にする必要があります。 移動およびリサイズツール
セグメントを別の開始時間又はトラックに移動するためには、移動ツール
セグメントの大きさを変えたい場合、リサイズツール Stretching and squashing segmentsセグメントのリサイズは、通常内容を減らすか、何らかの空白を追加する事によって、短くしたり長くしたりします。しかし、リサイズしている間Ctrlキーを押すことにより、代わりにセグメントの内容を伸張したり縮小することができます。また、セグメントを選択し、セグメント→伸張または縮小….(Segments → Stretch or Squash….)を選ぶことによっても行えます。 For segments that contain MIDI events, this re-spaces the events so that they are spread across the new segment's duration, playing back faster or slower than before but in the same relative proportions. For audio segments, this time-stretches the audio, altering its played speed without altering its pitch (as would happen if the audio was simply played back faster or slower). Time-stretching usually adds some audible artifacts as well, so the quality of your results may vary. Rosegarden does not alter the original audio file when time-stretching an audio segment, and if you rescale the same segment repeatedly it will always work from the original file instead of accumulating timestretching artifacts with each rescale. You can rescale both mono and stereo audio. 分割ツール
分割ツール 既定値では、セグメントは、カーソルに関係した最も近い小節線で分割されるが、これはセグメントを分割している間Shiftキーを押すことで抑制できます。 他の分割オプションセグメントメニューには数多くの、他の分割機能が用意されています。 Split on Silence Segments → Split → Split on Silence splits the selected segments on silences. This function works slightly differently depending on whether the selected segments contain audio or MIDI data. For audio segments, it offers you a dialog in which you can choose a threshold below which the segment is considered “silent”; it then splits the segment whenever its amplitude falls below this threshold. For MIDI segments, it simply splits the segment everywhere that a full bar of silence occurs. Split by Pitch Segments → Split → Split by Pitch… splits the currently selected segments into higher and lower parts. This function invokes a dialog allowing you to choose a pitch as a “split point”, and then splits the selected segments in half with all the notes on or above that split point in the “higher” segment and all the notes below it in the “lower”. If the music in the segment consists of two separate parts (e.g. left and right hand piano parts) that are not always completely on either side of a single split point, you may wish to select the “ranging split-point” option. If this is selected, Rosegarden will attempt to track the two parts as they move up and down, usually doing a slightly better job of separating out notes that were intended to lie in the two separate parts. The resulting segments are both created on the same track, with one overlapping the other. Split by Recording Source Segments → Split → Split by Recording Source… splits the currently selected segments according to the MIDI channel and device their events were recorded from. If you have recorded events from more than one MIDI channel or device into the a single segment, you can use this function to split them into separate segments afterwards. Select the channel or device whose events you want to split out, and the segment will be split into two segments, one containing events from the selected channel or device and the other containing the remaining events. The two segments are both created on the same track, with one overlapping the other. See also Recording and Track recording filters for more details on how to select the source MIDI channel or device for a recording. Split at Time Segments → Split → Split at Time… simply splits the currently selected segments into two parts at the time you specify. Tempo and Time SignatureTempo in RosegardenTempo rulersRosegardenの各 トラックエディタ、マトリクスエディタと譜面エディタは、編集領域の最上位に、任意に表示出来る、テンポルーラを用意しています。
The tempo ruler shows changes to tempo and time signature throughout the composition, and can be used for editing tempo. To increase or decrease the tempo within the range of a single tempo change, click and drag the horizontal line (or sloped line, for ramped tempos) representing that tempo upwards or downwards. To insert a new tempo change, right-click on the ruler for a menu and select Insert Tempo Change. This will insert a new tempo change with the same tempo as the prior one, which you can then drag to increase or decrease. You can also click and drag the starting point of a tempo change left or right to move that tempo change to a different time, and you can click and drag the ending point of a tempo change up or down to make the tempo ramp gradually towards an ending tempo value. Double-click on the tempo ruler to open the tempo and time signature editor. Tempo and time signature editorMarkers, ranges, and loopsマーカーTriggered segmentsトランスポートコンポジションを演奏するとき、Rosegardenは、再生ポインタを、トラック上で、左から右へとまたがる時に、セグメントの内容を演奏します。画面上でのポインタの位置は、トランスポート(Transport)と呼ばれるダイアログによって追跡され、制御されます。 概要
もしも、トランスポートが見えていないのであれば、設定→トランスポートを表示(Settings → Show Transport)で有効に出来ます。 トランスポートは、規定値では秒単位で再生ポインタから届く時間を表示します。
You can switch it to show musical time (bar and beat counts), musical time with a flashing visual metronome, or audio sample frame times, using the topmost of the small buttons
The button immediately below that
トランスポート上のメインコントロール The transport display also shows the tempo and time signature in effect at the current playback position. Double-click on either of these to insert a new tempo or time signature change. See Tempo and Time Signature for more ways to adjust these elsewhere in Rosegarden. You can also double-click anywhere on the main time display on the transport window, to enter a precise time that you want the playback position to be set to.
Additional controls and a MIDI event display are hidden on the bottom flap on the transport, which can be toggled on or off using the arrow button next to it at the left. Also on this extra portion there are buttons for recording, setting the loop start and end (see Ranges and loops), soloing individual tracks, turning on or off the metronome (see Metronomes), and silencing your MIDI devices (the panic button 録音
トラック中に新しいセグメントをログオンするために、まず始めに、トラックラベル上の赤(オーディオトラック上)か黄色(MIDIトラック用)を選択することによってトラックを強制的に録音状態にしておき、transport'sの録音コントロールを使います。This has the effect of both starting the transport, thus playing the existing composition, and recording into the appropriate track, or tracks. You can record any number of MIDI and audio tracks at once so long as your computer is powerful enough, and you have enough disk space. Be careful not to accidentally leave tracks selected when you have finished using them and are trying to record somewhere else. Alternatively you can use punch-in record to separate the acts of starting the transport and entering record mode. Punch-in record is toggled with the Space bar. You can press Space while playing a composition to switch instantly between playback and recording without stopping the transport, or you can use Space to arm for recording when the transport is stopped, so that a subsequent “play” will in fact record as well. (The latter is handy when synchronising to an external transport.) If you record to MIDI tracks, you will record from the MIDI devices that are selected for recording in the MIDI device manager, as filtered through the track level recording filter and the global MIDI filters. If you record to audio tracks, your recording to each track will be from the input currently selected for that track's instrument in the instrument parameter box. This will either be an external audio input or an audio submaster or master (for performing mixdowns). If it's an external input, it will by default record from your soundcard's first available physical record in. You may wish to use a JACK connection tool to connect some other JACK audio application to the input instead. See also Audio Routing. Synchronising to external transportsJACK TransportRosegarden supports the JACK transport mechanism for synchronising its transport with other JACK applications on the same computer. To activate it, go to Settings → Configure Rosegarden… and check the Use JACK transport box. When the JACK transport is in use, all of the applications that are subscribed to it share a common transport control, and you can start, stop, and move the transport from any one of them. Many Linux audio applications that use the JACK audio server also support JACK transport: consult their documentation for details of whether and how. MIDI Time CodeRosegarden supports MIDI Time Code (MTC) synchronisation in master and slave modes. This is particularly useful for synchronising the Rosegarden transport with a hardware MTC-capable device, or with software running on other computers connected via MIDI. To make Rosegarden the MTC Master, so that it will control any MTC slave device or application connected to it, go to Edit → Preferences and in the MIDI page's MIDI Sync tab, select MTC Masterfrom the MIDI Time Code menu. To make Rosegarden an MMC Slave so that Rosegarden's transport will automatically be synchronised with incoming MMC events, select MMC Slave. Infrared Remote ControlsRosegarden supports infrared remote controls for almost all transport functions. In order to use it, you need either the internal LIRC client, which is an optional feature at Rosegarden's compile time, or the KDE IRKick application (KDE LIRC daemon) that you can find in your Linux distribution's repositories. In both cases, you need to install and configure the LIRC server daemon. The exact details depend on your remote control and receiver, and you should refer to the LIRC web site for more information. You can find more details online about the internal LIRC client configuration file and IRKick basics, at Rosegarden's web site. スタジオデバイス、インストゥルメントとコネクションRosegardenは、“スタジオ”という単語を、コンピュータに繋がれているサウンドシステムについて知っている物すべてを参照するために使います。これは、MIDIとオーディオ用のハードウェアとその他のサウンドソフトウェアを含んでもよく、さらに、接続状態の情報と構成(configuration)とMIDIパッチやその他を含むことができます。スタジオはRosegardenで作成する全てのコンポジションのための組み込み機能です。 以下の3つの用語が、ここでは重要です: デバイス Rosegardenの範囲において “デバイス” という単語は、単に音を生成する能力がある何かです。これはMIDIやオーディオデバイスでかまいません。MIDIデバイスは物理的なMIDIポートに直接対応する必要はありません。それらは参照することができ、特定の手段で動作することが期待される、名前を持つ何らかのものです。MIDIパッチマップのような構成情報は、デバイスに割り当てることができます。 インストゥルメント 各デバイスはいくつかの“インスツルメント”を持ち、それらおのおのは特定の音を作るために仮定されます。それらは音を演奏するために選択されたトラックに割り当てることができるものです。既定値では、デバイスは起動時に生成される16のインスツルメントを持ちます。もしも、デバイスがMIDIデバイスであれば、16のMIDIチャネルのうちの1つに初期化されます。インストゥルメントは、たとえばプログラムの設定、リバーブ(reverb)、ボリュームなどのような特定のボイスのプロパティのすべてです。 コネクション MIDIデバイスが単に名前で、構成情報の集合の場合は“コネクション”は、どのMIDIポートに物理的 に割り当てられているかを指定します。これは、MIDI device managerで設定することが出来ます(オーディオとシンセサイザープラグインは同じ方法ではコネクションを持ちません)。 例をあげると、セットアップが、2つの物理MIDIポートを持つPCによって成り立っていて、その1つは外部のシンセサイザーが接続されていることを考えてみましょう。ここでは1台のシンセサイザーに対応するMIDIデバイスを持つために、通常Rosegardenを構成します。次に、このデバイスについて、名前を修正し、マップをパッチするように構成することができ、次にサウンドカードの関連するMIDIポートにそれを結合するために接続を指定します。それぞれの16個のデバイス上の既定値のインストゥルメントは、適切なプログラムとともに構成でき、それらをトラックに割り当てることができます。 実際の所、Rosegardenは既定値で、起動時に有効な接続を各デバイスに対して作成するでしょう。そのため、上記の例では、2つのMIDIデバイスは1つのみが必要だったとしても既定値で2つのデバイスが作成されるでしょう。一般的に、最初のものに対して名前を変え、パッチマップを適用し、2つめのものに対しては、削除するか未使用にします。コンピュータ上のMIDIポートに実際にどのシンセサイザーが接続されているかをRosegardenが知るすべはないことを覚えておいてくださいこの理由により、起動時に作成されるデバイスは、既定値のセットになり、構成するデバイスが本当に使うものに一致しているかどうかはあなた次第です。 いったん設定されると、スタジオの設定は、セーブする全てのRosegarden形式のファイルに格納されます。 MIDIデバイスの管理Managing banks and programs for MIDI devicesAudio RoutingMIDI RoutingAudio Mixer WindowThe MIDI MixerAudio PluginsメトロノームRosegardenは内蔵の2つのメトロノームを持っていて、その1つは録音中に使い、もう一つは通常の再生中にスイッチすることができます。それらはMIDIインストゥルメントにノートを送ることによって動作し、両方のメトロノームは同じインストゥルメント、ピッチとベロシティ情報を使います。
メトロノームを設定するためには、スタジオ→メトロノームの管理(Studio → Manage Metronome)を使い、メトロノームダイアログを起動します。そののち、メトロノームのためのMIDIインストゥルメントとメトロノームの解像度(1つのビートあたりのティック、ビートの再分割、あるいは小節あたり1ビート)を選択できます。MIDIシンセサイザーがメトロノームのティックのために使う実際のボイスのようなプロパティは、選択されたインストゥルメントに依存し、それは、トラックに割り当てられたインストゥルメントに依存するMIDIトラックのために使われるボイスのようです。メインウィンドウ上でそれにトラックを割り当てることで、インストゥルメントを構成することができ、インストゥルメントパラメータボックスから正しいプログラムを選択することができます。 メトロノームの録音と再生はトランスポートウィンドウでメトロノームボタンによってonまたはoffすることができます。このボタンは録音が供給されているか、実行中の時にメトロノームの録音を制御し、録音メトロノームはonにされ、再生メトロノームはoffにされます。既定値では、録音メトロノームはonになっていて、再生メトロノームはoffになっています。 Rosegardenは、また、“仮想のメトロノーム”も持っています。トランスポートウィンドウは、各ビートにおいて、フラッシュすることでそれを表現します。詳細はトランスポートの節を参照してください。 MIDI フィルタExternal MIDI control surfaces特別パラメータトラックパラメータボックス
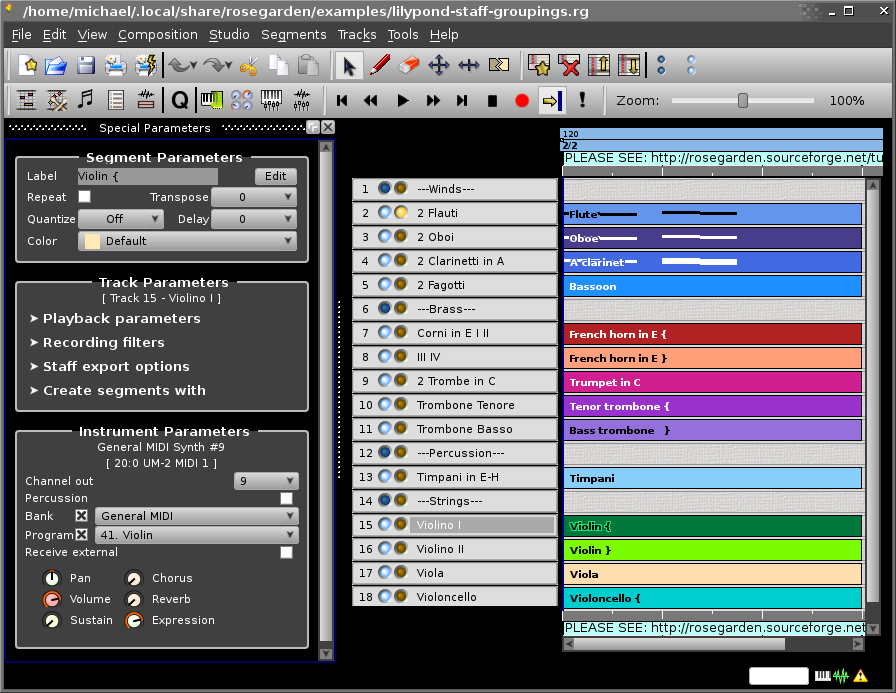
トラックパラメータボックスは、Rosegardenメインウィンドウの左端にあります。これは、現在選択されているトラックのパラメータを表示します。もしも見つからないならば、設定→特別パラメータの表示(Settings → Show Special Parameters)を試してみてください。 It allows you to assign instruments to tracks, control what incoming MIDI data from which sources will be recorded to particular tracks, control staff attributes (currently only for LilyPond export,) make selections that govern how MIDI segments will be created for each track that is assigned to a non-audio instrument, and apply these selections to existing segments. For example when converting a trumpet part from an imported MIDI file to be represented as notation playable by a real human on a real instrument. この表示ボックスは4つの部分に分かれます: Playback parametersThese provide an alternative mechanism to the menu-based system of instrument assignment. Track recording filtersThese provide you a way to control what events are recorded to this track. If you leave the default values “all” for both parameters, every received event will be stored in the track. This setting is safe and convenient if you are recording only one MIDI track. Otherwise, you should adjust one or both parameters to select only the desired events for the track. Device You can record from only one of the available devices marked for recording in the device manager, or from all of them simultaneously. Channel You can record from all channels, or limit recording to only one of the 16 available MIDI channels. In this case, only MIDI channel messages matching the channel number will be recorded, and system messages not having a channel (as system exclusive events) will be discarded. Both parameters are cummulative: you can filter only a device, only a channel, or both a device and a channel simultaneously. It is not mandatory to ensure mutually exclusive selections for all the armed tracks, but if you don't do so you will find duplicated events at several recorded tracks. The recording filters are also used to route MIDI events to the assigned track instrument when you are recording. Staff export optionsThese provide you with a means of exporting notation to render at either normal, small, or tiny size (eg for printing certain parts at cue size,) and allow you to export a variety of nested brackets. You are responsible for creating a series of bracket start and end markers that will yield a functional result, and if you make a mistake with these, it is likely that your file will not export or preview correctly in LilyPond. For a detailed, hands-on demonstration of brackets in action, please see this online tutorial. Create segments with
These provide you with a means of controlling many of the segment parameters for segments that don't yet exist. They are aimed especially at notation users, and they facilitate operations that require you to use more than one segment on a track (as when using repeats, or alternative endings), by allowing you to create a series of new segments that all have the same properties by default. Preset The Load button launches a dialog that allows you to pick a pre-defined collection of parameters that provide guidelines for how you should write parts for real-world instruments, and optionally convert any existing segments on this track to take on these new parameters.
You first pick a Category, then an Instrument, and finally choose whether you wish to write a part for an amateur or a professional player. The Scope controls allow you to choose whether these parameters will only affect segments that don't yet exist (which you will subsequently record, or draw with the pencil) or should convert any existing segments to take these parameters as well. (For a demonstration of the latter case in action, please see this online tutorial.) Clicking the OK button injects the appropriate parameters into the remaining widgets in this part of the track parameters box, where you can tweak them if you desire. Once you have loaded a preset, the name of your chosen preset will be used as the label for any segments you subsequently draw or record on this track, even if you change some or all of the associated parameters away from the values you just loaded. Clef This lets you choose the clef for any segments you subsequently draw or record on this track. Clefs are events, not properties. Your segments will be created with an initial clef event of the appropriate type (which you may subsequently alter or delete, should you have some occasion to do so.) The clefs available include a variety of named clefs representing standard clefs with various octave offsets. Transpose This causes segments on this track to be created so that their note events sound at a given transposition. Useful, especially, for writing parts for transposing instruments. Colour This causes segments on this track to be created using a given colour. Range The Low: and High: buttons, launch a dialog that allows you to pick a pitch using a staff. The lowest and highest pitches you select will then appear right on these buttons. These represent the lowest and highest playable notes, respectively, on the instrument for which you are writing notation. In some cases, these limits will be hard and fast, like the low B on a Transverse Flute (B foot). In others, they may only serve as guidelines to help you make good choices for instruments with which you are not intimately familiar. If you enter, record, or import data that has pitches exceeding the values specified, the note heads will appear in red by default. You can turn this behavior off with Preferences → Notation → Show notes outside playable range in red セグメントパラメータボックス
セグメントパラメータボックスは、Rosegardenのメインウィンドウ中の左側にあります。見つからない場合、表示→特別パラメータの表示(View → Show Special Parameters)を使ってみてください。これは、選択されたセグメントのいくつかの外見を変更することができます。 もしも1つのセグメントが現在選択されているならば、そのパラメータはセグメントパラメータボックス中で表示され、そこで編集できます。もしも複数のセグメントが選択されているならば、パラメータボックスは選択されたセグメントすべてで現在共通な値のみが表示されますが、それらは変更でき、それはすべての選択されたセグメントに反映されます。 ラベル 選択されたセグメント(もしも同じラベルを持っているならば、複数のセグメント)のラベルを表示します。編集(Edit)ボタンをクリックしてラベルの編集ができます。 繰り返し 選択されたセグメントの繰り返しのon/offを切り替えます。繰り返しを指定されたセグメントは、同じトラック上の継続するセグメントの開始点まで繰り返すか、継続するセグメントがない場合、インストゥルメントの最後まで繰り返します。 繰り返しているセグメントの繰り返している部分は、オリジナルのセグメントに比べて、メインキャンバス上で淡い色で表示されます。セグメントメニュー上で、セグメント→Turn Repeats into Copies(Segments → Turn Repeats into Copies)か、単純に単一の繰り返しブロック上でダブルクリックを行なうことによって、オリジナルのセグメントを真に編集可能なコピーに変更することができます。 クォンタイズ 選択されたセグメントのquantizationを表示します。すべてのそれらの音符の開始時間を簡単にクォンタイズするために、これを変更することができます。より詳細なquantizationについてはセグメント→クォンタイズ(Segments → Quantize….)を使います。詳細はQuantizationを参照してください。 移調 選択されたセグメントに現在適用されているtransposition(半音単位)を表示します。このtranspositionはセグメントが演奏されるときに適用され、マトリクス、譜面またはイベントリストエディタ内で表示される音符では見えまえん。コンポジション全部または一部分のピッチを簡単に変更するためと、たとえばクラリネットのように、移調するインスツルメントのために書かれた音符を含むセグメントとともに、これを一般的に使うことができます。 ディレイ 選択されたセグメント上で現在効力のあるディレイを表示します。演奏するために、後で書くより、セグメント全体にさせるために、ここでディレイを設定することができます。このディレイはセグメントが演奏されるときに適用されますが、マトリクス、譜面またはイベントリストエディタ内で表示される音符では見えません。 You can set a delay either in musical time (by choosing a note duration from the delay dropdown), in which time the exact delay will depend on the tempo, or in real time (by choosing a time in milliseconds from the dropdown). 色 選択されたセグメントが表示されるときに使われる色を表示します。ドロップダウン機能を使うか、ドロップダウンで見付からない場合、“新しい色を追加”オプションを選択することでその他の色を選択できます。
インストゥルメントパラメータボックスインストゥルメントパラメータボックスはRosegardenメインウィンドウの左サイドの、セグメントパラメータボックスのそばにあります。もしも表示されていないならば、表示→特別パラメータの表示(View → Show Special Parameters)を試してみてください。 これは、現在選択されたトラックに、どのインストゥルメントが割り当てられているかを表示し、そのインストゥルメントに対する、すべての編集可能なコントロールを含んでいます。同じインストゥルメントに複数のトラックを割り当てる事が出来るという理由で、この設定ボックス中の設定は、同時に1つ以上のトラックに影響するかもしれないことを覚えておいてください。 レイアウトとインストゥルメントパラメータボックスの内容は、インストゥルメントの種類(MIDI、オーディオ、あるいはシンセサイザープラグイン)に依存します。 MIDIインストゥルメントパラメータ
MIDIインストゥルメントに選択されたトラックが割り当てられた時、インストゥルメントパラメータボックスはMIDIパラメータを表示します。 一番上に、この表示ボックスは、インストゥルメントの名前と、このデバイスが使っているコネクションを表示します。 その下には、編集可能なMIDIチャネル番号と、パーカッションプログラムがこの設定中で提供されなければならないコントロールをトグルするためのパーカッションを含む再生の開始時に、インストゥルメントを送らなければならないバンクとプログラム設定が、表示されています。 最後に、この編集ボックスは、このデバイス(それらは上記で表示されている汎用MIDIデバイス)に対して有効なコントローラを表示します。ここで出来る任意の設定は、再生開始時にこのインストゥルメントのチャネルに送られます。 オーディオインストゥルメントパラメータ
オーディオトラックを選択した時、インストゥルメントパラメータボックスはオーディオパラメータを表示します。 表示ボックスには2つのメインフィーダがあり、1つは青い、再生音量用であり、もう一つは赤くて、このインストゥルメントに録音している時の録音音量用です。それらの間には再生レベルメータがあります。 表示ボックスの一番上の2つのメニューはインストゥルメントの、入力および出力オーディオルーティングを選択するのに使われます。それらの下には、インストゥルメントがモノラルかステレオかの指定、ステレオフィールドにおいてポジションのパン設定を行う指定を選択できます。
下の左にある5つのボタンからなるカラムは、エフェクトスロットです。それらをクリックして選択し、このオーディオインストゥルメント用にプラグインエフェクトを有効化し、plugin editor dialog シンセサイザープラグインインストゥルメントパラメータ
シンセサイザープラグインインストゥルメントに割り当てられたセグメントを選択した時、インストゥルメントパラメータボックスはシンセサイザープラグインパラメータを割り当てます。シンセサイザープラグイントラックがその中にMIDIデータがあるセグメントを使うにも関わらず、そのコントロールとルーティングに関しては、よりオーディオトラックのように振る舞うことに注意してください。 The most important control here is the button at top left (saying Xsynth in the above picture) which shows the name of the synth plugin in use for this instrument. Click this to select a particular synth and control it in the standard Rosegarden plugin editor dialog. Once you've selected a plugin, you may also be able to click the Editor button below it in order to open a dedicated GUI editor for the particular plugin if the plugin has one. The remaining controls here are the same as for audio instruments: the playback fader, playback level, output routing, mono/stereo and pan settings and effects slots are all exactly the same.
3] This database was compiled by Magnus Johansson, who deserves all the special mention we can muster for his outstanding effort on this. 4] No facility is provided at this time for assembling your own database of presets, or customizing the existing ones in a permanent way. 5] Audio instruments are always ultimately stereo, because the pan setting is always applied. But if you set the instrument to mono, it will reduce any audio data and effect outputs to mono before applying pan. クォンタイゼーション“クォンタイゼーション”は、音符とその他のイベントの再ポジショニングのプロセスであり、それらは正確な拍子の分割上で開始、終了します。It is traditionally used to make an approximate performance into a precise but rather mechanical-sounding one – either because precision is the desired effect, or for reasons such as making the notes clearer in notation. 一般的なクォンタイゼーションのためには、セグメント→クォンタイズ(Segments → Quantize) (=)か、マトリクスまたは譜面エディタ中の調整→クォンタイズ(Adjust → Quantize)を使います。This shows you a dialog in which you can select the precise quantization parameters you need, and then it applies these to all of the selected segments or notes.
The quantize dialog offers a selection of quantizers, each with its own set of parameters. The quantizers available are: Grid quantizer The grid quantizer moves the start times of notes so that they start at the nearest point on some grid (defined by various parameters of the quantizer). Thus notes that initially vary slightly in start time will be aligned by the quantizer, making for a more precise and mechanical performance. Legato quantizer The legato quantizer carries out a simple grid quantization, and also adjusts the note durations so as to remove any gaps between notes by extending each note so as to (at least) continue until the start of the following one. You can also obtain this legato effect without the accompanying grid quantization using Adjust → Quantize → Legato (-) in the matrix editor. Heuristic notation quantizer The notation quantizer attempts to adjust note start times and durations so as to produce readable notation. See Notation from performance data for a description of this quantizer and its uses. The grid quantizer has the following adjustable parameters: Base grid unit This is the size of the grid used for quantization. Swing This is a percentage figure which adjusts the degree by which alternate beats are quantized “late”. If set to None (the default), quantization will be to an even grid spaced according to the base grid unit. If set to 100%, every second grid line will be placed two-thirds of the distance between the previous and next ones, instead of only half. This will result in notes being quantized to the first and third triplets of a swing beat. Other settings will produce proportionately varying degrees of swinginess. You can also set this parameter to negative figures (for alternate beats to start early) or to figures greater than 100%. Iterative amount The default behaviour of the grid quantizer is to move each note exactly onto its nearest grid line. But if you set the iterative amount to something less than 100% (the “Full quantize” default), each note will only be moved that percentage of the distance toward its nearest grid line, resulting in a nearly-but-not-quite quantized effect. This quantizer may be applied repeatedly so as to try out gradually increasing degrees of quantization, hence the name “iterative”. Use Adjust → Quantize → Repeat Last Quantize (+) in the Matrix editor to do so. Quantize durations as well as start times If this option is enabled, the quantizer will quantize the notes' end times to the same grid as their start times. The quantize dialog also has an optional Advanced section containing further options for notation quantization. Another simple way to apply a grid quantizer is to do it in the main window, using the Quantize menu on the segment parameter box. If you select some segments and change the value shown in the menu, the segments will immediately be grid-quantized to the resolution shown in the menu. Finally, there is also a quantize control in the matrix view. マトリクスエディタThe Percussion Matrix editorThe Percussion Matrix editor is identical to the Matrix editor, except that it shows pitch names on the vertical scale instead of a piano keyboard, and it does not show the duration for each note. It can be found under Segments → Edit With → Open in Percussion Matrix Editor (D). This is intended for use with percussion programs on MIDI instruments, in which each note pitch plays a different percussion sound.
The pitch names are only shown if the segment being edited is playing through a percussion instrument that has an associated key mapping to define the names; otherwise the standard matrix view piano keyboard will appear instead. See Percussion Key Mappings for more information about key mappings. 譜面エディタThe Event List editorCustomising Rosegarden |


")


 : I can't find the reference to alternative endings SOM


